

- Which faces are the writing surface, and which material slot they use.
- Where those faces sit in UV space — because the page lands on the mesh through its UVs, and nothing else.
- The mesh’s real-world size and orientation, so the page’s physical dimensions and the reading pose both make sense.
/Inkwell/DemoProps/Meshes/) were authored
exactly this way; open them next to this guide and everything below has a live example.
The writing surface gets its own faces — and usually its own slot
Model the area the text should occupy as a distinct set of faces. Inkwell drives ink into one material slot on the target mesh (the display component’s Material Slot), so the cleanest setup gives the writing surface a dedicated slot and leaves the rest of the prop — frame, edges, back — on other slots that Inkwell never touches.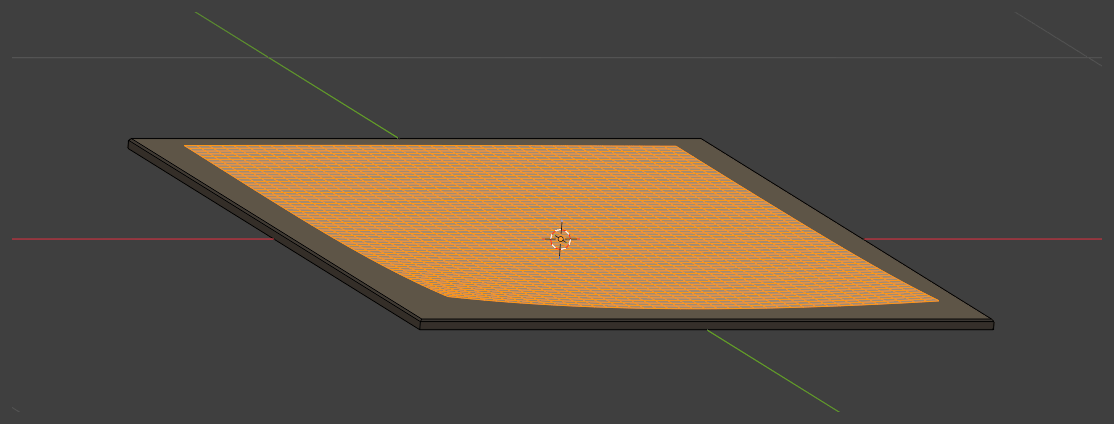
The shipped poster board in Blender: the paper face is its own face set (selected), inset from the ply frame that surrounds it.
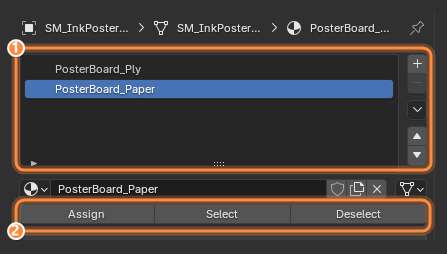
Two slots: the frame material and the paper face. In Edit Mode, select the writing faces and Assign them to the paper slot (1 — slot list, 2 — Assign).
1
1 — One slot per surface kind
PosterBoard_Ply is the frame; PosterBoard_Paper is the writing face. The material
names in Blender are placeholders — real materials are assigned in Unreal — but the
slot count and order survive the FBX round trip, and the paper slot’s index is
what you type into the display component’s Material Slot.2
2 — Assign the writing faces
In Edit Mode, select the writing faces, pick the paper slot, press Assign. Every
face in that slot will carry paper and ink; every face outside it is left alone.
A single-slot mesh is fine too — the crumpled page and the scroll each have one material
covering the whole prop, and Material Slot stays at 0. Use a dedicated slot when the
prop is more than paper (boards, signs, books with covers), or when you want
Mesh’s Own Material mode to leave the rest of the
prop’s look untouched.
UVs are the whole contract
Inkwell maps the page onto the mesh through its UVs. The face mapping on the document (Page Face on the display component) can pick a rectangle and turn it in quarter turns, but it cannot fix a bad unwrap — what a mapping can express is exactly what an affine transform can. So the unwrap is where the quality is decided:- Axis-aligned, non-overlapping island. Unwrap the writing surface as one rectangular island, page-upright: U runs along the page’s width, V up its height. No other island may overlap it — overlapping faces would repeat the writing.
- Match the page’s aspect ratio. The island’s proportions should match the document’s page (an A4 document is 21 × 29.7 cm). If the island is squashed relative to the page, the writing is squashed by exactly that much — Inkwell will not re-proportion it.
- Fill the square, or declare the region. The simplest unwrap spans the full 0–1 square — that is the flat-sheet assumption and the default (Fit: Full UV Range). But an island can sit anywhere, at any size, if the face mapping says where.
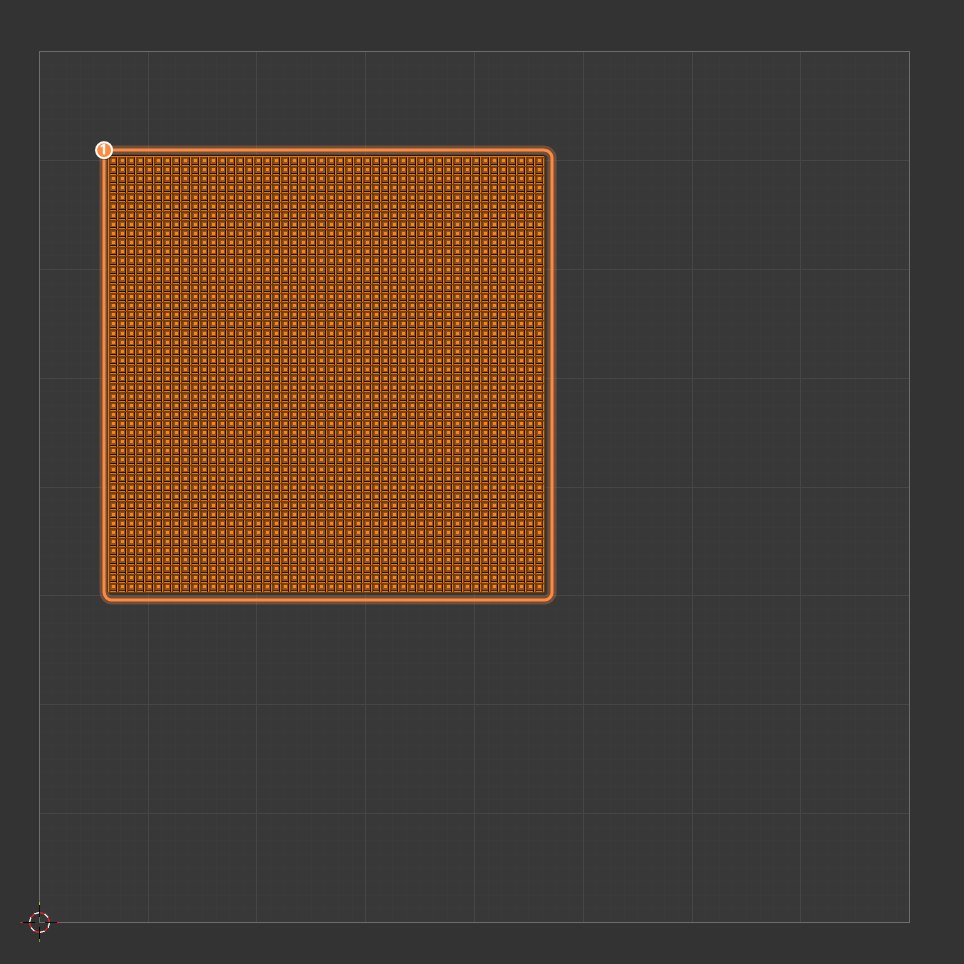
The shipped sticky note's unwrap: the writing face occupies one rectangle of an otherwise empty UV square. The document's face mapping (Fit: Custom Region) names that rectangle, and the ink lands inside it.
FInkPageFaceMapping), and when to reach
for each:
Rotation Quarter Turns (0–3) rescues the unwrap that came out sideways or upside
down — quarter turns on purpose, because they can never clip the page’s corners against
the region. Ink On Back Face controls whether back-facing geometry that shares the
front’s UVs shows the writing mirrored through, the way real paper does; turn it off for
bare paper backs.
Size, orientation, and pivot
- Author at real-world size. One Blender meter is 100 Unreal units. The shipped props are literal: the crumpled page is 0.21 × 0.297 m (A4), the sticky note 0.076 m square. The document’s Page Width Cm describes the page; the mesh should agree with it, or the reader will hold up a page whose physical size and printed size disagree.
- Lie flat, face up. Author the sheet lying in the XY plane facing +Z, width along +X, top along +Y — that is how a page is authored for Inkwell, and it is what makes the reader’s pickup, the flip animation, and wall mounting all orient correctly.
- Apply your transforms. Rotation and scale belong baked into the mesh data, not left on the object. An unapplied transform exports as a surprise.
Materials: what Blender decides, and what Unreal decides
In Blender you decide the slots. In Unreal you decide what fills them, and there are two ways a custom mesh takes its ink — both covered in depth on the paper page:- Custom material — the document’s Paper Material replaces the writing slot. Your
material graph carries the
MF_InkwellPageInkmaterial function wherever the ink should multiply in. - Mesh’s own material — Inkwell replaces nothing: it makes a dynamic instance of the
material the slot already wears (per mesh instance, so instance overrides survive) and
drives only the ink parameters. The one contract: that material must contain
MF_InkwellPageInk, or the paper renders and the ink silently doesn’t — check the Output Log for theLogInkwellwarning if a page comes up blank.
Exporting FBX
The settings that matter, as used to export every shipped prop:
On the Unreal side, import with Import Materials and Import Textures off (slots
arrive as empty names for you to fill), and skip Nanite for props this light.
Check it in five minutes
1
Import and slot check
Import the FBX, open the static mesh, and confirm the slot order — note which index
the writing surface took.
2
Point a display component at it
Add an Ink Page Display to an actor with your mesh, set Document, Target
Mesh, and Material Slot. With Preview In Editor on, the page appears
immediately.
3
Fix placement with the face mapping, not the mesh
Writing sideways? Rotation Quarter Turns. Writing covering the whole prop when it
should sit in one panel? Fit: Auto Fit or Custom Region. Writing stretched?
That one is the mesh — the island’s aspect doesn’t match the page’s, and the honest
fix is in the DCC.
Next
Paper and the material contract
The four paper modes, and where MF_InkwellPageInk goes in your material.
Ink Page Display
Material Slot, Page Face, and every other knob the mesh plugs into.
The shipped examples
The scroll, poster, sticky note, and crumpled page, placed and readable.