

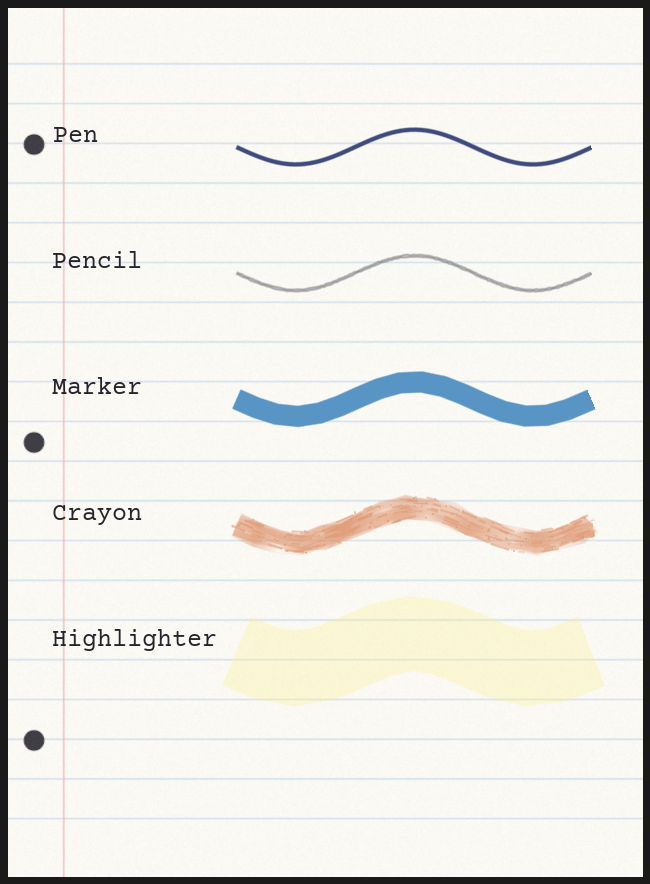
One stroke per brush: pen, pencil, marker, crayon, highlighter.
The five brushes
EInkBrushType, in the order the Brush dropdown lists them.
Every brush that jitters seeds its randomness from the stroke’s own points, so a stroke
looks the same every time it is drawn — in the editor preview, in the bake, and after a
reload. Nothing is rolled fresh at paint time.
The Drawing Tools panel
Bottom of the Page Editor’s left column, under Default Text Style.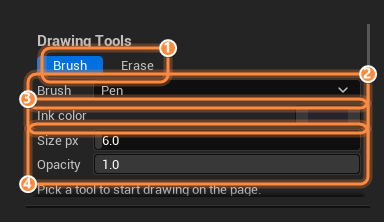
Drawing Tools: the tool toggles, the brush, and the ink it lays down.
1
Brush / Erase
The two tools. Clicking either one switches the page into Draw mode immediately —
reaching for a brush and then having to find a mode button somewhere else is not how a
brush works.
2
Brush
Which of the five brushes the next stroke uses. Default Pen. The brush, the ink
color, and the opacity all disappear while Erase is selected — Size px is the
only one of them the eraser uses.
3
Ink color
The color of the next stroke, alpha included. Strokes keep the color they were drawn
with — changing this never restyles a mark already on the page. Default is the same warm
near-black the document’s default text color uses,
(0.02, 0.017, 0.025).4
Size px
Stroke width in page pixels — pixels of the document’s Page Size Pixels, not
screen pixels, so a stroke keeps its proportions however the page is scaled. Range
1–120, default 6. This is also the eraser’s width, and the ring under the cursor is
drawn at this size.
5
Opacity
Multiplies the brush’s own transparency. A highlighter is already faint before this
touches it. Range 0.05–1, default 1.
Drawing on the page
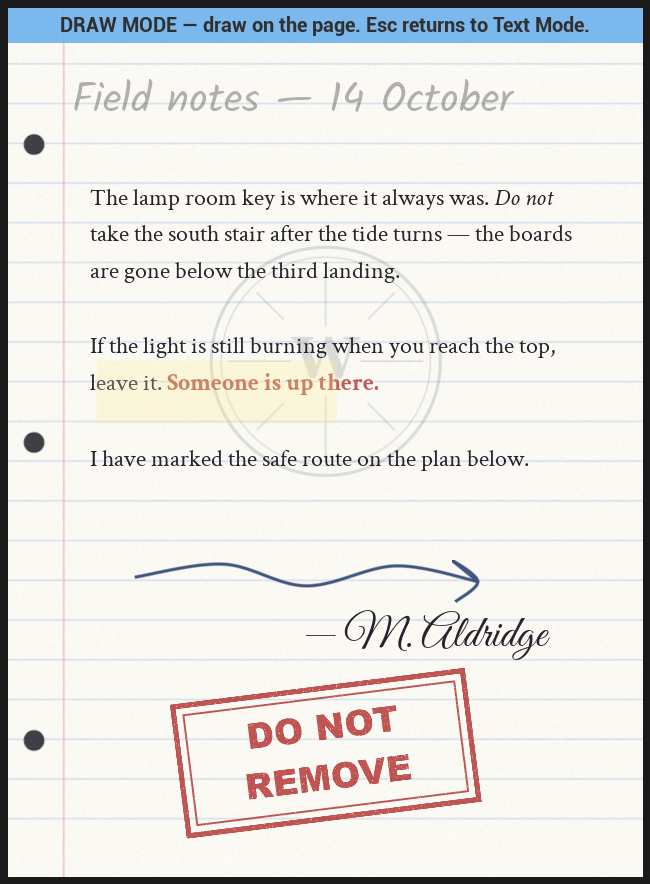
Draw mode. The banner is the reminder that typing is suspended.
1
Enter Draw mode
Click Draw in the toolbar’s Mode group, or pick a tool in Drawing Tools —
that arms Draw mode by itself. The banner across the page reads DRAW MODE — draw on the
page. Esc returns to Text Mode., and the cursor becomes a crosshair with a ring at the
current brush size.
2
Add or select a drawing layer
Click + Drawing in the Layers panel, or select an existing Drawing layer’s row. You
can skip this: drawing on the page with no drawing layer selected makes one, inserted
in front of the current selection, and the new layer plus the stroke are a single undo
step. Entering Draw mode when nothing suitable is selected also picks up the frontmost
usable drawing layer for you.
3
Choose the brush, color, and size
Set them before you draw. A stroke is stamped from the palette at mouse-down, so changing
the palette mid-stroke never re-styles the line in progress.
4
Draw
Press, drag, release. You see the real mark as you drag — the live stroke goes through the
same renderer the bake uses, so the line you drag is the line that comes out of the oven.
Nothing is written to the document until you let go, which is what makes one stroke one
undo step (“Draw Stroke”). A click with no drag is still a mark: it draws a dot.
5
Erase
Click Erase and sweep over the ink. See below.
6
Undo
Ctrl+Z, through the normal editor undo stack. One stroke is one step; one eraser sweep
is one step, however much it took out. An eraser sweep that touched nothing leaves no undo
step at all.
7
Back to typing
Esc, or click Text in the Mode group.
Strokes land on the side of the sheet being edited. Flip the sheet with the Front /
Back toggle under the page list and Draw mode works the same on the back — a map
sketched on the back of a letter really is on the back, and drawing the first mark on an
untouched back is one of the ways a back becomes authored.
The eraser
The eraser rubs out the ink under the cursor, not the stroke that ink belongs to. This matters more than it sounds:- A stroke erased through the middle becomes two strokes, each keeping the original’s brush, color, width, and opacity. It is the same mark with a bite out of it, not a new one.
- A stroke erased at one end comes back shorter. A stroke erased everywhere goes away.
- Untouched stretches come back with exactly the points they were authored with — the eraser does not resample ink it never reached.
- One sweep is one undo step. The transaction opens on the first real cut and every later cut in the same sweep joins it.
The stroke data model
Useful if you generate marks from Blueprint or from C++ — a signature stamped at runtime, a crossed-out line revealed by a quest, a scribble whose position depends on save data.FInkStroke — one continuous mark
FInkStrokePoint — one sample along it
Normalized coordinates are why strokes survive everything: the same points bake at full page
resolution, bake clamped down on a huge document, and preview at whatever size the editor
pane has room for.
WidthPx is the one value that is not normalized, so it is scaled by the
widget’s real width over the document’s Page Size Pixels X when it is painted.
Pressure comes from touch input only. Slate reports touch force from 1.0 for an ordinary
press up to 10 for a hard one, which Inkwell clamps into the 0.05–1 range
Pressure uses; a
mouse has no pressure at all and every point it produces gets a flat 1.0. Strokes you build
in Blueprint can vary it freely — tapering the last few points is what makes a generated
mark look drawn rather than plotted.Recipe: add a stroke from Blueprint
- Build the points: for each sample, Make Ink Stroke Point with a normalized Position and a Pressure, into an array.
- Make Ink Stroke — set Brush, Color, Width Px, Opacity, and the Points array.
- Make Ink Drawing — set its Strokes array (existing strokes first; the list is drawn oldest first).
- Make Ink Page Layer — Type =
Drawing, Name = something readable, and the Drawing member from step 3. - Add Page Layer (
PageIndex, the layer) to put it at the front of the page, or Move Page Layer afterwards to drop it behind the writing. The Side pin defaults toFront; passBackto scribble on the back of the sheet instead. - Refresh on any Ink Page Display showing that page. (Add Page Layer bumps the document’s content revision, so cached bakes are already invalidated.)
Drawing.Strokes,
and write the whole array back with Set Page Layers — the getter hands you a copy, so
nothing changes until you do.
Next
Layers
Where strokes live, and how to stack a highlight under the words.
Paper
The stock the ink sits on — textures, generated sheets, or your own materials.
Page Editor
Modes, the toolbar, and the rest of the window.
Rendering reference
How strokes, text, and images become one baked ink texture.