

UInkPageDocument)
gets it one of four ways, chosen by Paper at the top of the Paper & Ink section in
the Page Editor’s left column:
PaperMode defaults to Texture. The Paper dropdown is shown while you edit the front
of a sheet; flip to the back and a Back paper dropdown takes its place — see
the back’s paper.
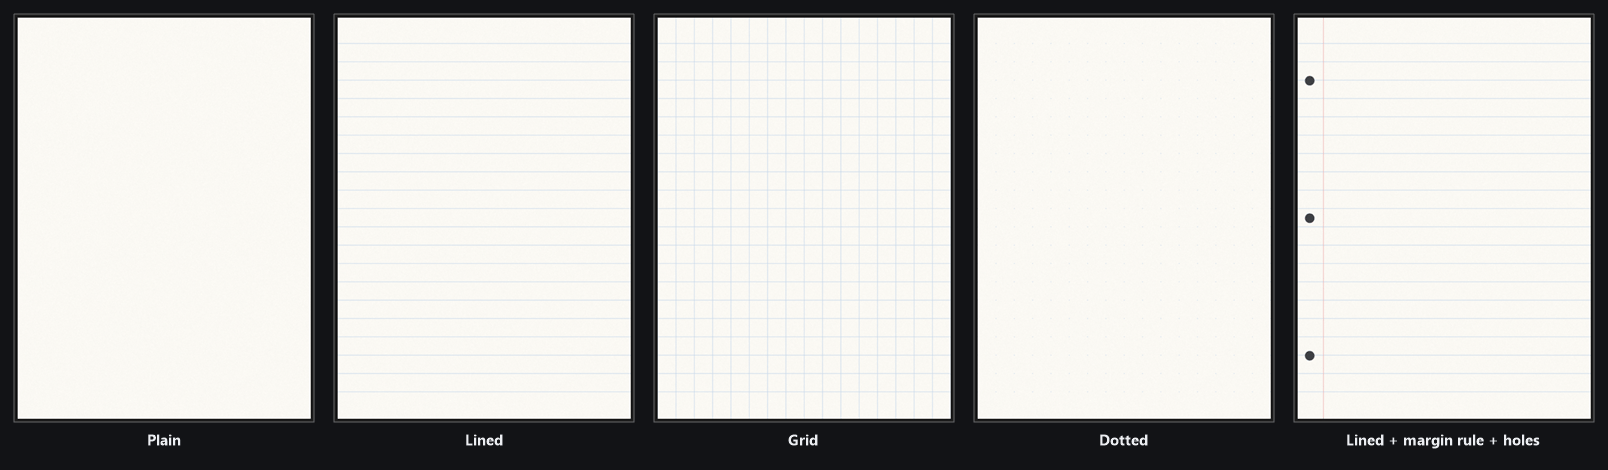
Generated paper: a strip of plain, lined, grid, dotted, and lined stock with a margin rule and punched holes.
Texture asset
The simplest mode: point Paper texture (all pages) at anyUTexture2D and every page
in the document sits on it. With the picker left empty the page rides the project’s
Default Paper Texture (Project Settings > Plugins > Inkwell, T_PaperPlain out of the
box) — and only if that is also unset or unloadable does the page material fall back to its
plain-paper color.
Generated paper
Everything inFInkProceduralPaper, with the real defaults from InkPageLayer.h. Distances
are in page pixels — pixels of the document’s Page Size Pixels — so they scale with
the page rather than with the screen.
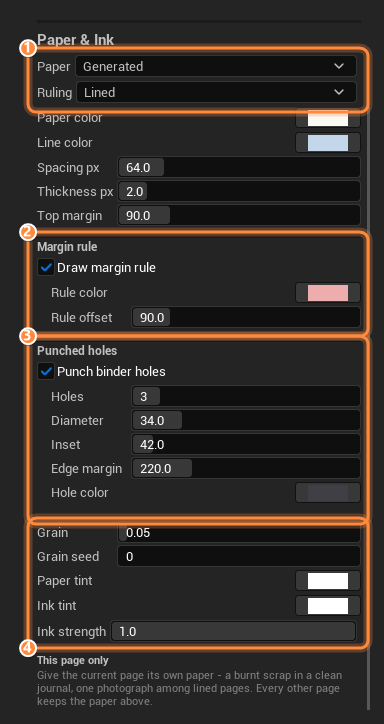
The Paper & Ink section with Generated selected: ruling, margin rule, and punched holes.
Printing on real stock
Texture base turns the generated sheet from flat color into printed paper: the sheet starts as the base texture (or the project’s Default Paper Texture when none is named), Paper color multiplies over it as a tint — keep it near white to show the stock as authored — and the ruling, margin rule, holes and grain print on top exactly as they do on flat stock. It is the way to get “my parchment, but lined” without authoring a lined parchment texture. The generated result is cached like any other sheet, keyed on the resolved stock, so changing the project default regenerates every sheet that rides it.The four rulings
- Plain — no ruling at all. Still gets grain, a margin rule, and holes if you ask for them.
- Lined — horizontal writing lines every
LineSpacingPx, startingTopMarginPxfrom the top and stopping the same distance from the bottom. - Grid — the same rows plus vertical rules at the same pitch, so cells come out square. The column run is centered across the width, which leaves equal margins on both sides instead of a ragged part-cell jammed against one edge.
- Dotted — a dot at each grid intersection, radius
0.75 × LineThicknessPx. Dots sit on exactly the line centers Grid would use, so switching a sheet between Grid and Dotted never shifts the writing guides.
The margin rule
bMarginRule is independent of the ruling: a Plain sheet can still carry a red line, and on
a Lined sheet the rule draws over the ruling. It is drawn at LineThicknessPx, centered
on MarginRuleOffsetPx from the left edge, and its color’s alpha is honored.
Punched holes
Holes are spread evenly betweenHoleEdgeMarginPx from the top and the same from the bottom
(clamped to half the page height). A single hole centers on the sheet instead of sitting at
the top margin. Each punch gets a shaded rim just inside its edge, derived from HoleColor
rather than being a fixed gray, standing in for the cut edge of the stock catching less
light.
Grain
GrainStrength is multiplicative per-pixel fiber noise applied to the paper color under
the ruling: printed lines sit on paper, they are not made of it. It multiplies rather than
adds, so the stock keeps its hue instead of drifting gray. The default 0.04 is a barely
perceptible tooth; push it to 0.15 for cheap pulp, drop it to 0 for a laser-printed sheet.
GrainSeed picks which noise you get. Two documents with identical settings and different
seeds get different fiber — worth setting when several notes in one scene share a look and
you do not want them to be visibly the same sheet.
How the sheet is produced
The generated texture is built once per distinct set of settings and cached on the document, so twenty pages sharing a document share one sheet. A back generated with identical settings reuses the front’s cached sheet rather than rasterizing a second copy. It is built at the document’s clamped bake size — Page Size Pixels, reduced if either axis exceeds Max Page Bake Dimension in Project Settings → Plugins → Inkwell (default 4096) — so the paper always matches the ink texture it sits behind, pixel for pixel. It carries a full mip chain generated in linear space, so the ruling does not alias or darken when the page is a couple of meters away. The sheet is transient: it lives in memory, is never saved into the asset, and is regenerated from the settings on load. Change any procedural setting and the cache hash stops matching, so the next request rebuilds it — which is why the Page Editor’s preview updates as you drag a slider.Recipe: lined notebook paper
1
Switch to Generated
In the Page Editor’s left column, find Paper & Ink and set Paper to Generated.
The paper texture picker disappears and the ruling controls take its place.
2
Pick the ruling
Set Ruling to Lined. Spacing px is the distance between ruled lines in page
pixels, 64 by default. Set it against the pitch of your own text — Size in Default
Text Style and Line height in Page Setup decide that — and check the result in
the 3D Preview rather than by arithmetic: writing that sits on the lines is the
only test that counts.
3
Set the head and foot
Top margin is the blank paper above the first line and below the last. Match it to the
document’s vertical Margins in Page Setup so the writing starts on a line.
4
Add the red line
Tick Draw margin rule. Set Rule offset a little smaller than the document’s
horizontal Margins — at the shared default of 90 the rule lands exactly under the
text block’s left edge — and pick a Rule color; the default dusty red reads as a
school exercise book.
5
Punch it
Tick Punch binder holes. Leave Holes at 3, set Inset well left of the rule
offset, and set Hole color to the color of whatever surface the page will be seen
against.
6
Rough up the stock
Nudge Grain to about 0.06 and give Grain seed a number of its own. Then check the
3D Preview at the top of the right column — it is baked through the same path
the game uses.
Custom material
Custom material hands the whole page material over to you. The document’s Paper Material (PaperMaterial) replaces whatever material the target slot wore — a wood desk,
aged vellum, an animated hologram — and your graph carries the ink by containing the
MF_InkwellPageInk material function (/Inkwell/Materials/MF_InkwellPageInk): drop it
into the graph and wire your final color through it. The function carries the named
parameters Inkwell drives, so every runtime control — the baked ink, Ink tint, Ink
strength, face mapping onto custom meshes — keeps working inside your material.
1
Build the material
Make your material as usual, add the
MF_InkwellPageInk material function, and route
the color that would have gone to your output through it. What comes out is your surface
with the page’s ink laid over it.2
Assign it
Set Paper to Custom material and pick the material in the picker that appears
under the dropdown. The panel’s hint text restates the contract right there.
3
Check the preview
The 3D Preview bakes through the same path the game uses, so the writing
should appear on your material immediately. If it does not, see the warning below.
PD_Scroll in /Inkwell/DemoProps/Documents/
uses Custom material with M_InkAgedParchment, and PD_Poster uses M_InkPosterBoard
— both materials live in /Inkwell/DemoProps/Materials/ and both carry
MF_InkwellPageInk. Open either material to see how little wiring the function needs.
While Custom material is active (and a material is actually assigned), the paper inputs on
this page do not apply: no paper texture, no generated ruling, and no per-page paper
override — your material is the paper. Ink tint and Ink strength still work, and
so does Paper tint if your graph chooses to use the parameter the function carries.
Mesh’s own material
Mesh’s own material (MeshMaterial, display name Mesh’s Own Material) is the mode
for props that already look right: no paper comes from Inkwell at all. The ink is laid onto
whatever material the mesh already wears — Inkwell finds the target slot’s existing
material per mesh instance, makes a dynamic material instance of it, and writes only
the ink parameters onto that. Your per-instance textures and parameter overrides all
survive; a dynamic instance already sitting in the slot (yours, or Inkwell’s from a
previous page turn) is driven in place rather than wrapped or replaced.
The one requirement is the same function as above:
The contract: the mesh’s material must contain the
MF_InkwellPageInk material
function for ink to appear. A material without the function shows no ink and raises no
error — that is the contract, not a failure. Unlike Custom material, which replaces the
slot with a material the document names, this mode never replaces anything.Per-page override
Dead last in the Paper & Ink section, under the heading This page only, sits a texture picker for the page currently on screen — the page’s ownPaperOverride. Set, it
beats the document paper — Texture asset or Generated — for this page alone;
cleared, the page goes back to the document’s paper. Use it for the one page in a journal
that is a torn receipt. Flip the sheet over and the same picker reads This page’s back
only and writes the page’s BackPaperOverride instead.
The override is a texture, so it has no effect on a page whose paper comes from a material:
under Custom material (with a material assigned) and Mesh’s own material the
material owns the paper and the override is never applied to it.
The back’s paper
A sheet’s back can wear different paper from its front. The document-level control is Back paper — it appears in Paper & Ink in place of the Paper dropdown while the Back side is being edited — backed byFInkPaperFace BackPaper on the document, whose
Mode is an EInkBackPaperMode:
There is deliberately no Mesh’s own material entry here — that mode already means “the
mesh decides”, both faces included.
Everything about the back’s paper edits through the same controls as the front’s: flip to
Back and the texture picker, the generated-paper settings, and Paper tint all read
and write the back’s own values (
BackPaper.Texture, BackPaper.Procedural,
BackPaper.Tint). While the back is Same as front there is nothing to edit — the
section collapses to the one dropdown.
Two more things to know:
BackPaper.Tintis multiplied over the back’s paper the way Paper tint is over the front’s, and applies once the back declares a mode of its own.- The back’s Custom material is slab-only. A flat single-slot mesh has one material for
both faces, so its back keeps the front’s material and
BackPaper.Materialis ignored there. On a mesh with a distinct Back material slot — the plugin’s own page sheet is one — it applies.
Paper tint, ink tint, ink strength
Three document-level controls sit under the mode-specific ones and apply whatever the mode:Reading paper from Blueprint
Three pure nodes on the Ink Page Document asset resolve what a page actually wears:The other Procedural Paper
Ink Page Display (UInkPageDisplayComponent) has a boolean also called Procedural
Paper (bProceduralPaper, default true). It is a completely different thing, and the
shared name is the only thing the two have in common.
The component’s boolean makes the page spawn its own sheet of paper — a transient static
mesh sized from the document — when the actor has no mesh of its own. Nothing on this page
changes when you toggle it, and nothing on that component changes the ruling, the holes or
the grain. The spawned sheet, its collision, when it steps aside for a mesh you supplied, and
when to turn it off are covered under
Procedural Paper on Ink Page Display.
Next
Ink Page Display
The component that prints a page onto a mesh, including its own Procedural Paper.
Layers
What gets stacked on top of the paper — on both sides of the sheet.
Page Documents
Page size, margins, and the rest of the document’s properties.
Rendering reference
How paper and baked ink meet in the page material.