

UInkPageDocument) is not “some text with pictures
around it”. It is an ordered stack of layers, and each layer is one of three things: a body
of text, a placed image, or a set of brush strokes. Where the text sits in that stack is
what decides whether an image is a watermark under the writing or a stamp over it.
The stacking model
A page (FInkPageSpec) owns a Layers array of FInkPageLayer. The bake walks that array
in order and draws each layer over the one before it:
- Index 0 is the back of the page. It draws first, and everything else draws on top.
- The last entry is the front. It draws last, over everything.
Delta = +1. Send Backward is Delta = -1.
The two sides of a sheet
A page is one side of a physical sheet, and the sheet has another. AlongsideLayers (the
front) a page carries BackLayers — everything drawn on the back of the same sheet,
authored independently under exactly the same stacking rules. Which side is meant is an
Ink Page Side (EInkPageSide): Front or Back.
In the Page Editor, the Front / Back toggle sits directly under the page list —
page picks the sheet, the toggle picks the side. Flip to Back and the page surface, the
Layers panel, and every mode work on the back’s stack instead. The Back button reads
Back • when the current sheet has an authored back, so a journal’s backs can be
surveyed without flipping every sheet.
Three rules make backs free until you use them:
- An empty
BackLayersarray means the back was never authored. The sheet renders bare paper there, and it costs no bake and no render target. Every document saved before backs existed loads exactly like this. - Putting any layer on the back authors it.
HasBack()flips to true, and the back starts baking like any page. - Deleting the back’s last layer un-authors it again. The “a page must keep one Text layer” rule is a front rule only — on the back, deleting the last layer of any kind is the gesture that returns the underside to bare paper at zero cost.
Layer types
A layer struct carries all three payloads; only the one matching
Type is drawn, and only
that one is shown when the layer is edited in a details view — change a layer’s Type
and the matching payload appears in its place. Nothing is thrown away: the other payloads
keep their data, which is what makes switching a type back harmless.
Text layers
Text is a layer payload, not a page property. A page can carry a heading, a body, and a signature as three separate text layers, with images or drawings stacked between them.A text layer whose
Size is zero on either axis fills the page inside the document
margins (FInkPageText::FillsPage()). That is exactly how a page written as one block of
text behaves, and it is what every page authored before text layers existed becomes. A
page-filling box wraps and follows the margins; a placed box wraps at its own explicit
width. Give a filling box a Box W and Box H and it turns into a placed box you can
drag.Line spacing, per box
Line height in Page Setup sets the spacing for the whole document, and every text layer follows it. A single box can break ranks with its own Line height in the layer panel — which is what a heading, a block of verse or a signature usually wants, since a script or display face needs room that body text does not. The layer’s spin box always reads the spacing the box is actually drawn at: the document’s until you change it, its own afterwards. Once it holds an override the reset arrow appears beside it, and clicking that hands the box back to the document.LineHeightPercentage is 0 on a text layer that has not overridden anything, and 0 is
the sentinel rather than a real spacing — FInkPageText::ResolveLineHeight() is what turns
it into the number the bake uses. Read InheritsLineHeight() rather than comparing to zero
yourself.Image layers
Per-layer controls
Every layer, whatever its type, has these four:What locked actually prevents
A locked layer still draws, on the page and in the bake. Locking is purely about not grabbing it by accident. While a layer is locked you cannot:- select it — clicking its row or its content on the page does nothing;
- drag it around the page surface;
- drag its row to a new place in the Layers list;
- double-click its content on the page to activate it;
- draw strokes into it (a locked Drawing layer is never a stroke target).
The Layers panel
The panel is the bottom half of the Page Editor’s right column, under the 3D preview. The splitter between them is draggable, so you can squeeze the preview down to a thumbnail when the work is in the layers. It always shows the stack of the side being edited: flip to Back and the rows are the back’s layers.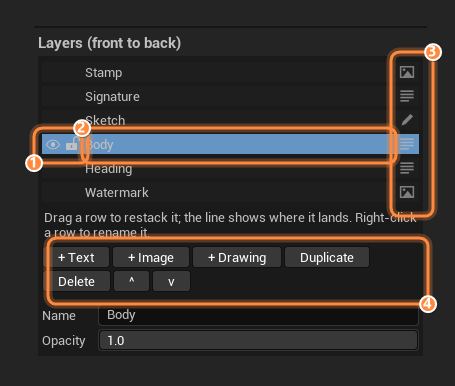
The Layers panel: front-to-back rows, each with an eye, a lock, a name, and a type badge.
1
1 — Eye and lock
The eye is visibility: click to hide the layer, and it is skipped by the preview and the
bake alike. The closed eye stays lit on an idle row, because a hidden layer is a surprise
waiting to happen at bake time. The padlock locks the layer against selection and
dragging — it keeps drawing either way, and the lit padlock is what explains why a row
refuses to be picked up.
2
2 — Row and name
One row per layer, frontmost at the top; the selected row is highlighted. Drag a row to
restack it — an insertion line shows where it will land. Right-click for the row menu.
A layer with no name of its own is listed by its type.
3
3 — Type badge
The icon on the right-hand edge of the row says what kind of layer it is: text, image, or
drawing. It is a label, not a button — clicking the row still selects the layer. Its
tooltip names the kind (“Image layer - a texture placed on the page”).
4
4 — Add and reorder
+ Text, + Image and + Drawing add a layer in front of the selected one;
Duplicate and Delete act on the selection, and ^ / v move it one step
towards the front or the back.
Working the panel
1
Add a layer
+ Text, + Image, or + Drawing. New layers land in front of the selected
layer (one row above it in the list), and the editor switches to the mode that can edit
them: Text mode for a text layer — with the caret already in the new box — Image mode for
an image, Draw mode for a drawing.A new text layer is created as a placed box at
Position (0.15, 0.15), Size (0.5, 0.25) — deliberately not page-filling, since a second full-page box would sit
invisibly over the first. A new image layer starts at Position (0.35, 0.35),
Size (0.3, 0).2
Select one
Click its row, or double-click the thing itself on the page. Double-clicking selects the
layer and switches to the right mode — double-click writing and you land in Text mode
with the caret in that box; double-click a picture and you land in Image mode ready to
drag it. Selecting a layer always pulls the mode with it.
3
Restack by dragging
Drag a row up or down the list. The insertion line shows where it lands, and the whole
drag is one undo step (“Reorder Layer”). The ^ and v buttons do the same thing one
step at a time, towards the front and towards the back respectively.
4
Right-click for the row menu
Rename (clear the name and the list goes back to the type-derived fallback),
Duplicate (payload included; the copy lands directly on top of the original),
Delete, Visible and Locked toggles, Bring Forward, and Send Backward.
5
Edit the selected layer
Under the buttons, the properties for whatever is selected: Name and Opacity for
every layer, plus the texture picker and X / Y / Width / Height / Rotation for an
image, the stroke count and Clear Strokes for a drawing, and Box X / Box Y / Box W /
Box H / Line height for a text layer.
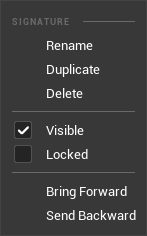
The row menu on a layer named SIGNATURE: rename, duplicate or delete it, toggle Visible and Locked, or move it one step through the stack.
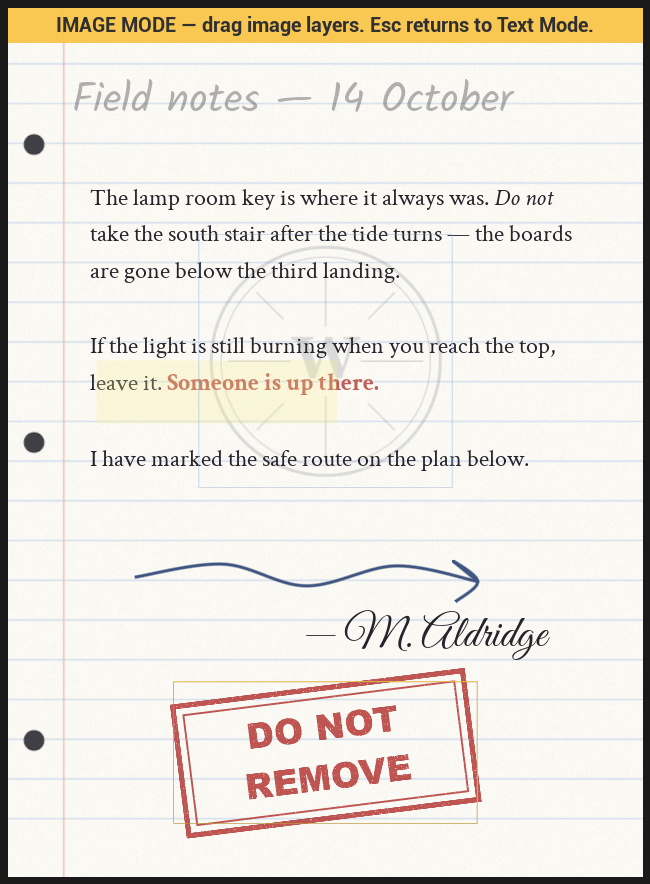
Image mode: an image layer can be dragged anywhere in its area, not only by a handle.
A layer draws in the editor but not in the game
A layer draws in the editor but not in the game
Check the eye. Hidden layers are skipped by the editor preview and by the runtime bake
alike, and it is easy to hide one while chasing a stacking problem and forget.
A row will not select, drag, or accept strokes
A row will not select, drag, or accept strokes
It is locked. The padlock on the row is lit when it is — click it, or use Locked in the
right-click menu. Locking changes nothing about how the layer draws, in the editor or in
the game.
Three recipes
A watermark behind the writing
The stamp goes below the text layer in the panel — earlier in the array — so the writing draws over it.1
Select the text layer
Click its row. New layers land in front of the selection, so this is the anchor.
2
Add the image layer
Click + Image, pick the texture in the layer properties, and drag it into place in
Image mode. It is currently in front of the text.
3
Send it behind
Right-click the image row → Send Backward (or drag its row below the text row). It is
now index-wise earlier than the text, so the writing draws over it.
4
Fade it
Set the layer Opacity to something like 0.15. Layer opacity reaches the whole layer,
so the image goes translucent while the writing stays solid.
A stamp over the writing
Identical, minus the last two steps: add the image layer while the text layer is selected and leave it where it lands — in front. Turn its Rotation a few degrees off square so it reads as something pressed onto the page rather than composited into it.Several independent text boxes
1
Write the body
Type into the page’s existing text layer. It fills the page inside the margins, so it is
the one that behaves like a normal page of writing.
2
Add the heading
+ Text, then — in Text mode, with the new box selected — drag it to the top of the
page by the strips around its outline, and size it with Box W / Box H. Type into it
directly: a selected text box takes the caret. Set its alignment with the toolbar’s
justify buttons; justification is per box.
3
Add the signature
+ Text again, drag it to the bottom right, set that box to right-aligned, and give it
a script font from the toolbar’s font picker.
4
Name the rows
Right-click each row → Rename: Heading, Body, Signature. Three rows all called
“Text” is how a page stops being editable a month later.
Blueprint API
Every function below is on the Ink Page Document asset, in the Inkwell | Page Document category. Layer indices are array indices — index 0 is the back of the page, not the top row of the panel. Every layer function takes a Side pin (an Ink Page Side:Front or Back, defaulting to Front), so the same calls read and
write the back of a sheet.
Three behaviors worth knowing before you write against these:
- Set Page Layers repairs the front. A front stack containing no Text layer gets one
appended, because a page with nowhere to draw its markup renders blank paper. The same
repair runs on Add Page and on load. It deliberately does not run on the back: an
empty back is the legal un-authored state, and the zero-cost guarantee hangs off it —
which also means Set Page Layers with an empty array and
Side = Backis how you un-author a back from Blueprint. - Set Page Layers, Add Page Layer, Remove Page Layer, and Move Page Layer all bump the document’s content revision, which is what invalidates cached bakes. If you mutate a layer struct you pulled out with Get Page Layers, you are working on a copy — write it back with Set Page Layers or nothing on screen changes.
- Adding a layer to an unauthored back authors it — the sheet starts baking a back and the reader will flip to it. Nothing else needs to be set.
Recipe: add a watermark from Blueprint
- Make Ink Page Layer — set Type to
Image, Name toWatermark, Opacity to0.15. - On its Image member: set Texture, Position
(0.2, 0.3), Size(0.6, 0.0). - Find Text Layer Index (
PageIndex) → store asTextIndex. - Add Page Layer (
PageIndex, the new layer) → returnsNewIndexat the front. - Move Page Layer (
PageIndex,NewIndex,TextIndex - NewIndex) — a negative delta, which drops the image behind the writing. - Refresh on any Ink Page Display already showing that page.
Documents authored before layers existed are converted when they load. The old
per-page markup moves onto the page’s first Text layer and the old images fold into the
stack on whichever side of the writing their behind/over flag asked for. There is nothing
to do, no button to press, and no version number to set — the migration is driven by the
page’s own data and is safe to run repeatedly. Re-save the asset when convenient so the
converted stack is what ships.
Next
Drawing
The five brushes, the eraser, and the stroke data model behind Drawing layers.
Paper
What the layers are stacked on: textures, generated stock, your own materials — front
and back.
Page Editor
The window the Layers panel lives in, and everything else in it.
Page Documents
Page geometry, margins, default text style, and the document-level Blueprint API.