> ## Documentation Index
> Fetch the complete documentation index at: https://docs.teriyakigaming.com/llms.txt
> Use this file to discover all available pages before exploring further.
# Quickstart
> Working paper in two minutes, then a page of your own, wired into your own interaction system
Four stages: press Play in the bundled showroom and see everything working, author a page
of your own, put it on an actor in your level, and wire reading into the interaction
system your project already has. That last stage is the point — Inkwell's reading pipeline
is built to be driven by *your* interact verb, and the bundled demo pieces exist only to
show you the calls.
If the plugin is not installed and enabled yet, do [Installation](/plugins/inkwell/installation) first —
this page assumes the **Page Editor** button is in your Level Editor toolbar.
In the Content Browser, open **Settings** and turn on **Show Plugin Content**. Then
browse to **Plugins → Inkwell Content → Maps** and open **`L_InkwellShowroom`**.
Press Play.
You are standing in a room of readable paper: six podium exhibits, a gallery wall and
a wall poster. Walk up to any of them:
| Input | Does |
| ------------------------------------- | --------------------------------------------------------------------- |
| **WASD** / mouse | Walk and look |
| **E** | Pick up the page you are looking at (and put it back) |
| **Left / Right arrow** or mouse wheel | Turn pages — a sheet with a written back turns over first, book order |
| **F** | Flip the sheet over to its back |
| **Q** | Put the page back where it lay |
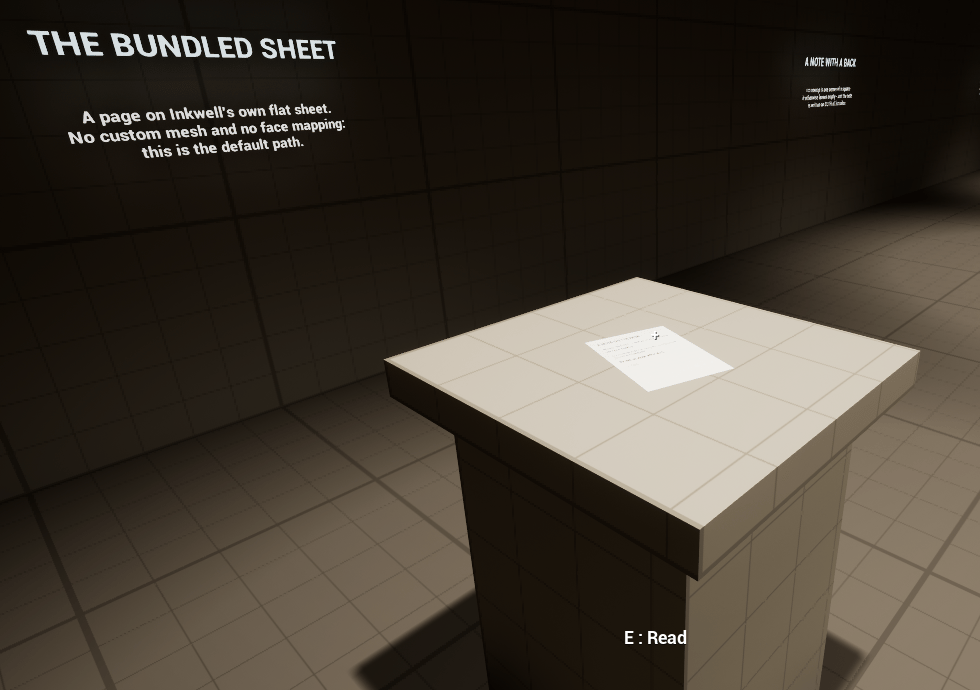 The map works in an empty project because its GameMode Override is the **Inkwell
Reader Game Mode** (`AInkwellReaderGameMode`), which spawns the **Inkwell Reader
Character** — a first-person pawn whose movement and look input is built at runtime in
C++, so no project input assets are involved at all.
Everything that makes the showroom play by itself — the reader game mode, the reader
character, the **Ink Page Interactor** component, the exhibit component and the read
prompt widget — is a demo and reference implementation, not recommended for production
use. The production components are Ink Page Display, Ink Page Stack, the Ink Page
actor and widget, and the **Ink Page Reader** — the component your own interaction
system drives in step 4.
In the Content Browser, right-click in the empty space of a folder in your project and
choose **Inkwell → Page Document**. Name the asset and press Enter.
That asset (`UInkPageDocument`) is the content: every page, every layer, the paper and
the default text style. A new one is seeded from your project settings so it renders
something immediately — a 1024 × 1400 px page, the bundled plain paper texture, and
the project's default font at Regular weight. It opens straight into the Page Editor.
The map works in an empty project because its GameMode Override is the **Inkwell
Reader Game Mode** (`AInkwellReaderGameMode`), which spawns the **Inkwell Reader
Character** — a first-person pawn whose movement and look input is built at runtime in
C++, so no project input assets are involved at all.
Everything that makes the showroom play by itself — the reader game mode, the reader
character, the **Ink Page Interactor** component, the exhibit component and the read
prompt widget — is a demo and reference implementation, not recommended for production
use. The production components are Ink Page Display, Ink Page Stack, the Ink Page
actor and widget, and the **Ink Page Reader** — the component your own interaction
system drives in step 4.
In the Content Browser, right-click in the empty space of a folder in your project and
choose **Inkwell → Page Document**. Name the asset and press Enter.
That asset (`UInkPageDocument`) is the content: every page, every layer, the paper and
the default text style. A new one is seeded from your project settings so it renders
something immediately — a 1024 × 1400 px page, the bundled plain paper texture, and
the project's default font at Regular weight. It opens straight into the Page Editor.
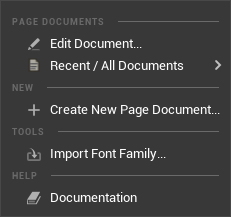
 From the Level Editor toolbar, open the **Page Editor** dropdown and choose
**Create New Page Document...** — you get an asset-save dialog, and the new document
opens in the editor when you confirm. The same dropdown holds **Edit Document...**
(a browser dialog), **Recent / All Documents** (documents you edited recently plus a
filter-as-you-type list of every one in the project), and a **Documentation** entry
that opens this site. Right-clicking a placed actor that references a document
offers **Inkwell → Edit Pages (*DocumentName*)...** in the viewport too.
From the Level Editor toolbar, open the **Page Editor** dropdown and choose
**Create New Page Document...** — you get an asset-save dialog, and the new document
opens in the editor when you confirm. The same dropdown holds **Edit Document...**
(a browser dialog), **Recent / All Documents** (documents you edited recently plus a
filter-as-you-type list of every one in the project), and a **Documentation** entry
that opens this site. Right-clicking a placed actor that references a document
offers **Inkwell → Edit Pages (*DocumentName*)...** in the viewport too.
 The window opens in three resizable panes:
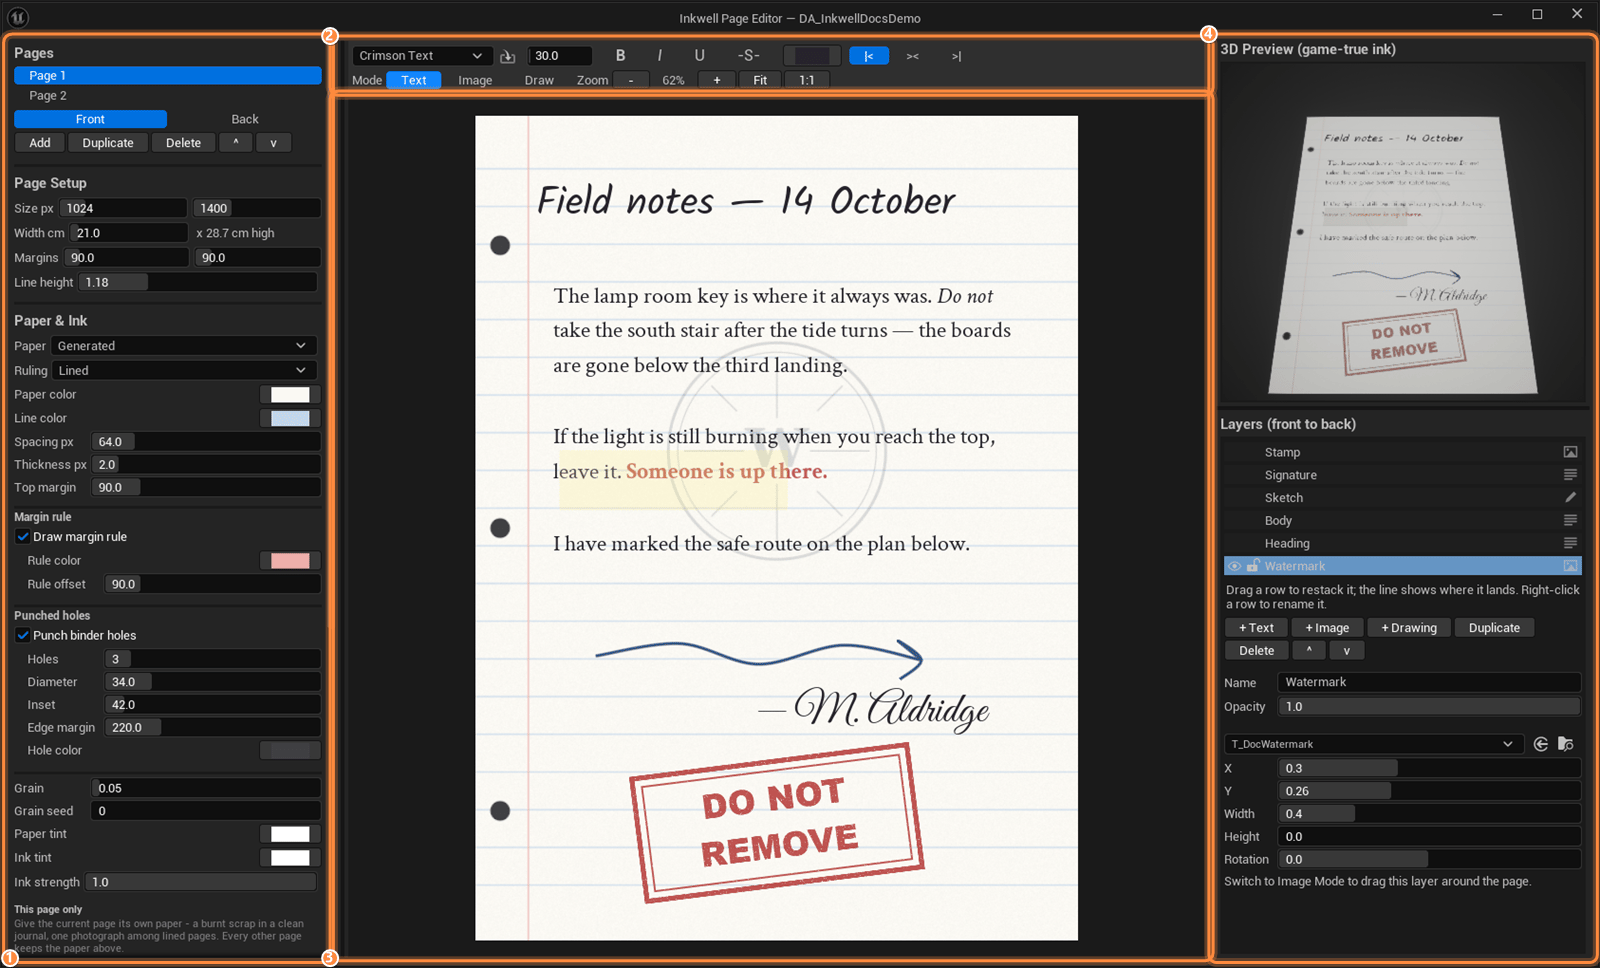 Everything about the document: **Pages**, **Page Setup**, **Paper & Ink**,
**Custom Mesh**, **Default Text Style**, **Drawing Tools**, and the
**Save Document** button at the bottom.
Styling for the text you have selected: font family, size, **B** / **I** / **U** /
**-S-**, text color, and the three justify buttons. On the right, **Mode**
switches the page surface between **Text**, **Image** and **Draw**.
The paper itself, at the shape you authored. In Text mode you click into it and
type; each text box is outlined so you can see where it ends.
**3D Preview (game-true ink)** on top — the page put through the same bake path
the game uses — and **Layers (front to back)** underneath.
Click on the paper and type. A new document opens with one Text layer that fills the
page inside the document margins, so you can start writing immediately. Then style it:
select some text, pick a **font family** (the five bundled families are listed first),
set a **size**, toggle **B** / **I** / **U** / **-S-**, or click the color block to
recolor the selection. Watch the **3D Preview** on the right as you go — it is the
truth: if a font falls back or a color reads wrong there, it will read wrong in game.
When you want more than one block of text, an image, or something drawn by hand, use
the buttons under the Layers list: **+ Text**, **+ Image**, **+ Drawing**. See
[Layers](/plugins/inkwell/authoring/layers), [Drawing](/plugins/inkwell/authoring/drawing) and
[Paper](/plugins/inkwell/authoring/paper) — none of it is needed for this walkthrough.
Finish by clicking **Save Document** at the bottom of the left panel.
Save from that button rather than from the Content Browser. Rich-text markup stores
fonts as string paths, which the cooker cannot see — **Save Document** is what
refreshes the document's **Font References** list so those fonts get cooked. Skip it
and styled runs fall back to the default font in a packaged build.
Two routes. Take the first if you want paper in the world; take the second if the note
belongs on a prop, a desk, a clipboard or a corkboard you already have.
Open the **Place Actors** panel (**Window → Place Actors**), search for
**Ink Page**, and drag it into your level. It is the ready-made single sheet
(`AInkPageActor`) and lands as a flat piece of paper.
With it selected, find the **PageDisplay** component in the Details panel's
component list and set its **Document** to your new asset. The writing appears on
the sheet immediately — the display component previews in the editor viewport, no
Play needed.
The sheet then sizes itself: **Page Width Cm** from the document (21 cm, the width
of A4, unless you changed it) with the height following the page's shape. Two knobs
adjust this copy without touching the document:
| Property | Where | What it does |
| -------------- | ----------------------------------- | ------------------------------------------------------------------------------------------------------------------ |
| **Page Scale** | the PageDisplay component | 1 is the document's own size, 2 twice as big, 0.5 half. Scales both axes together, so the writing never stretches. |
| **Page Yaw** | the actor, under *Inkwell \| Sheet* | Spins the sheet about its own normal so the writing reads upright for your scene. |
Select the actor in the level (or open its Blueprint), click **Add Component**, and
add **Ink Page Display**. Set its **Document** to your asset.
**Procedural Paper** is on by default, and it is what makes this a one-property
setup: if the actor has no mesh of its own, the component spawns a paper sheet,
attaches it to the actor's root, and sizes it from the document. Swap in a document
authored at a different size and the sheet resizes, live in the viewport.
It never takes a mesh away from you. If the actor already has a mesh component — or
you pick one in **Target Mesh** — the page is drawn onto that instead and no sheet
is spawned. Turn **Procedural Paper** off to leave a mesh-less actor drawing
nothing.
Drawing onto your own mesh needs clean 0–1 UVs across the page face. An
atlas-mapped prop mesh will garble the text, because the baked ink is sampled
across the full 0–1 range. If the prop has several material slots, set
**Material Slot** to the one the paper face uses.
* No mesh, and **Procedural Paper** turned off: the component has nowhere to
draw. Turn it back on, or set **Target Mesh**.
* The page landed on the wrong material slot — **Material Slot** is 0 by default.
* **Preview In Editor** is off: the page still appears in Play, but not in the
viewport.
* Nothing in the level at all: check the Output Log for `LogInkwell` — the
component logs a warning naming exactly what is misconfigured.
Press Play and walk over to it. The page is real geometry at the size you authored, so
it reads from a normal standing distance — and lean in and the strokes hold, because
the ink is baked at the document's own pixel resolution rather than stretched from a
small texture.
To let the player pick the page up — float it in front of the camera, turn pages, put
it back exactly where it lay — add an **Ink Page Reader**
(`UInkPageReaderComponent`) to your pawn or player controller.
The reader is the production presentation engine, and it contains no input handling
whatsoever: it is a pure snap-into-view service that your interaction code calls.
Whatever your project's interact verb is — an Enhanced Input action, a trace in a base
interactable Blueprint, a trigger volume — the wiring is the same four calls:
1. **Begin reading.** In your interact handler, take the actor your existing focus
trace hit and call **Begin Reading Actor** on the reader — it finds the Ink Page
Display on the actor for you. (Call **Begin Reading** instead if you already have
the display component.) It returns false when the actor has no readable page or
something is already being read, so you can fall through to your other
interactables.
2. **Turn pages.** From your UI or input, call **Next Page** and **Previous Page** on
the reader. On a sheet with an authored back, **Next Page** reads in book order —
front, back, then the next page.
3. **Flip the sheet.** **Flip Page** turns the held page over to show its back.
Out of the box the reader also binds **F** to this (**Bind Flip Key**, default on,
key editable) — turn that off once you bind your own flip input.
4. **Put it back.** **End Reading** floats the page back to exactly where it lay.
Bind the reader's events to keep your HUD honest: **On Reading Started** /
**On Reading Ended** (hide the crosshair, show a "put back" prompt), and
**On Reading Side Changed** for a Front / Back label that swaps exactly on the turn.
While a page is held, the reader stops the pawn by default — **Lock Movement While
Reading** and **Lock Look While Reading** are both on, and release the moment
**End Reading** is called. The hold distance is computed from the page's real size
(**Fit Page To View**, default on), so a sticky note and a poster are both held where
they fill the screen comfortably.
Two reference implementations show this wiring, both demo-only:
* The **Ink Page Interactor** (`UInkPageInteractorComponent`) is the complete "look
at a page, press a key, read it" component from the showroom — a view trace every
0.1 s out to 300 cm, an **On Focus Changed** event for a prompt, and default keys
(**E** / **Q** / **Left** / **Right**, plus the mouse wheel) behind an
**Enable Default Input** switch. Read it as a worked example; in production, make
the calls above from your own system instead. See
[Ink Page Interactor](/plugins/inkwell/components/interactor).
* The example input assets in `/Inkwell/Examples/Input/` — `IA_Interact`,
`IA_NextPage`, `IA_PreviousPage`, `IA_PutBack` and the mapping context
`IMC_InkwellDefault` binding them to E / Right / Left / Q and the mouse wheel — are
there for projects that drive their own pawn with Enhanced Input and want
ready-made actions to start from.
## Next
The worked example: a base interactable Blueprint, focus prompts, reading, page turns
and flips, all driven by your own system.
Every property and Blueprint node on the component your interaction system drives.
The toolbar, the three modes, layers, paper and the game-true preview, end to end.
What ships in the showroom and /Inkwell/Examples/, and how each piece is wired.
Everything about the document: **Pages**, **Page Setup**, **Paper & Ink**,
**Custom Mesh**, **Default Text Style**, **Drawing Tools**, and the
**Save Document** button at the bottom.
Styling for the text you have selected: font family, size, **B** / **I** / **U** /
**-S-**, text color, and the three justify buttons. On the right, **Mode**
switches the page surface between **Text**, **Image** and **Draw**.
The paper itself, at the shape you authored. In Text mode you click into it and
type; each text box is outlined so you can see where it ends.
**3D Preview (game-true ink)** on top — the page put through the same bake path
the game uses — and **Layers (front to back)** underneath.
Click on the paper and type. A new document opens with one Text layer that fills the
page inside the document margins, so you can start writing immediately. Then style it:
select some text, pick a **font family** (the five bundled families are listed first),
set a **size**, toggle **B** / **I** / **U** / **-S-**, or click the color block to
recolor the selection. Watch the **3D Preview** on the right as you go — it is the
truth: if a font falls back or a color reads wrong there, it will read wrong in game.
When you want more than one block of text, an image, or something drawn by hand, use
the buttons under the Layers list: **+ Text**, **+ Image**, **+ Drawing**. See
[Layers](/plugins/inkwell/authoring/layers), [Drawing](/plugins/inkwell/authoring/drawing) and
[Paper](/plugins/inkwell/authoring/paper) — none of it is needed for this walkthrough.
Finish by clicking **Save Document** at the bottom of the left panel.
Save from that button rather than from the Content Browser. Rich-text markup stores
fonts as string paths, which the cooker cannot see — **Save Document** is what
refreshes the document's **Font References** list so those fonts get cooked. Skip it
and styled runs fall back to the default font in a packaged build.
Two routes. Take the first if you want paper in the world; take the second if the note
belongs on a prop, a desk, a clipboard or a corkboard you already have.
Open the **Place Actors** panel (**Window → Place Actors**), search for
**Ink Page**, and drag it into your level. It is the ready-made single sheet
(`AInkPageActor`) and lands as a flat piece of paper.
With it selected, find the **PageDisplay** component in the Details panel's
component list and set its **Document** to your new asset. The writing appears on
the sheet immediately — the display component previews in the editor viewport, no
Play needed.
The sheet then sizes itself: **Page Width Cm** from the document (21 cm, the width
of A4, unless you changed it) with the height following the page's shape. Two knobs
adjust this copy without touching the document:
| Property | Where | What it does |
| -------------- | ----------------------------------- | ------------------------------------------------------------------------------------------------------------------ |
| **Page Scale** | the PageDisplay component | 1 is the document's own size, 2 twice as big, 0.5 half. Scales both axes together, so the writing never stretches. |
| **Page Yaw** | the actor, under *Inkwell \| Sheet* | Spins the sheet about its own normal so the writing reads upright for your scene. |
Select the actor in the level (or open its Blueprint), click **Add Component**, and
add **Ink Page Display**. Set its **Document** to your asset.
**Procedural Paper** is on by default, and it is what makes this a one-property
setup: if the actor has no mesh of its own, the component spawns a paper sheet,
attaches it to the actor's root, and sizes it from the document. Swap in a document
authored at a different size and the sheet resizes, live in the viewport.
It never takes a mesh away from you. If the actor already has a mesh component — or
you pick one in **Target Mesh** — the page is drawn onto that instead and no sheet
is spawned. Turn **Procedural Paper** off to leave a mesh-less actor drawing
nothing.
Drawing onto your own mesh needs clean 0–1 UVs across the page face. An
atlas-mapped prop mesh will garble the text, because the baked ink is sampled
across the full 0–1 range. If the prop has several material slots, set
**Material Slot** to the one the paper face uses.
* No mesh, and **Procedural Paper** turned off: the component has nowhere to
draw. Turn it back on, or set **Target Mesh**.
* The page landed on the wrong material slot — **Material Slot** is 0 by default.
* **Preview In Editor** is off: the page still appears in Play, but not in the
viewport.
* Nothing in the level at all: check the Output Log for `LogInkwell` — the
component logs a warning naming exactly what is misconfigured.
Press Play and walk over to it. The page is real geometry at the size you authored, so
it reads from a normal standing distance — and lean in and the strokes hold, because
the ink is baked at the document's own pixel resolution rather than stretched from a
small texture.
To let the player pick the page up — float it in front of the camera, turn pages, put
it back exactly where it lay — add an **Ink Page Reader**
(`UInkPageReaderComponent`) to your pawn or player controller.
The reader is the production presentation engine, and it contains no input handling
whatsoever: it is a pure snap-into-view service that your interaction code calls.
Whatever your project's interact verb is — an Enhanced Input action, a trace in a base
interactable Blueprint, a trigger volume — the wiring is the same four calls:
1. **Begin reading.** In your interact handler, take the actor your existing focus
trace hit and call **Begin Reading Actor** on the reader — it finds the Ink Page
Display on the actor for you. (Call **Begin Reading** instead if you already have
the display component.) It returns false when the actor has no readable page or
something is already being read, so you can fall through to your other
interactables.
2. **Turn pages.** From your UI or input, call **Next Page** and **Previous Page** on
the reader. On a sheet with an authored back, **Next Page** reads in book order —
front, back, then the next page.
3. **Flip the sheet.** **Flip Page** turns the held page over to show its back.
Out of the box the reader also binds **F** to this (**Bind Flip Key**, default on,
key editable) — turn that off once you bind your own flip input.
4. **Put it back.** **End Reading** floats the page back to exactly where it lay.
Bind the reader's events to keep your HUD honest: **On Reading Started** /
**On Reading Ended** (hide the crosshair, show a "put back" prompt), and
**On Reading Side Changed** for a Front / Back label that swaps exactly on the turn.
While a page is held, the reader stops the pawn by default — **Lock Movement While
Reading** and **Lock Look While Reading** are both on, and release the moment
**End Reading** is called. The hold distance is computed from the page's real size
(**Fit Page To View**, default on), so a sticky note and a poster are both held where
they fill the screen comfortably.
Two reference implementations show this wiring, both demo-only:
* The **Ink Page Interactor** (`UInkPageInteractorComponent`) is the complete "look
at a page, press a key, read it" component from the showroom — a view trace every
0.1 s out to 300 cm, an **On Focus Changed** event for a prompt, and default keys
(**E** / **Q** / **Left** / **Right**, plus the mouse wheel) behind an
**Enable Default Input** switch. Read it as a worked example; in production, make
the calls above from your own system instead. See
[Ink Page Interactor](/plugins/inkwell/components/interactor).
* The example input assets in `/Inkwell/Examples/Input/` — `IA_Interact`,
`IA_NextPage`, `IA_PreviousPage`, `IA_PutBack` and the mapping context
`IMC_InkwellDefault` binding them to E / Right / Left / Q and the mouse wheel — are
there for projects that drive their own pawn with Enhanced Input and want
ready-made actions to start from.
## Next
The worked example: a base interactable Blueprint, focus prompts, reading, page turns
and flips, all driven by your own system.
Every property and Blueprint node on the component your interaction system drives.
The toolbar, the three modes, layers, paper and the game-true preview, end to end.
What ships in the showroom and /Inkwell/Examples/, and how each piece is wired.