> ## Documentation Index
> Fetch the complete documentation index at: https://docs.teriyakigaming.com/llms.txt
> Use this file to discover all available pages before exploring further.
# Page Editor
> The Inkwell Page Editor window end to end: opening it, the toolbar, the three edit modes, zoom, two-sided sheets, the layers and pages lists, and the 3D game-true preview.
The **Inkwell Page Editor** is the window where you author a
[Page Document](/plugins/inkwell/authoring/documents): type onto the paper, style runs from a toolbar,
stack images and freehand drawing in [layers](/plugins/inkwell/authoring/layers), flip the sheet over to
write its back, and watch a 3D preview rendered through the exact bake path the game uses.
No C++, no Blueprint.
The WYSIWYG guarantee is structural rather than cosmetic. The edit box uses the same
rich-text marshaller class as the runtime bake, the strokes on the page are drawn by the
bake's own stroke renderer, and the preview composites the real baked ink through the same
lit material a placed actor wears.
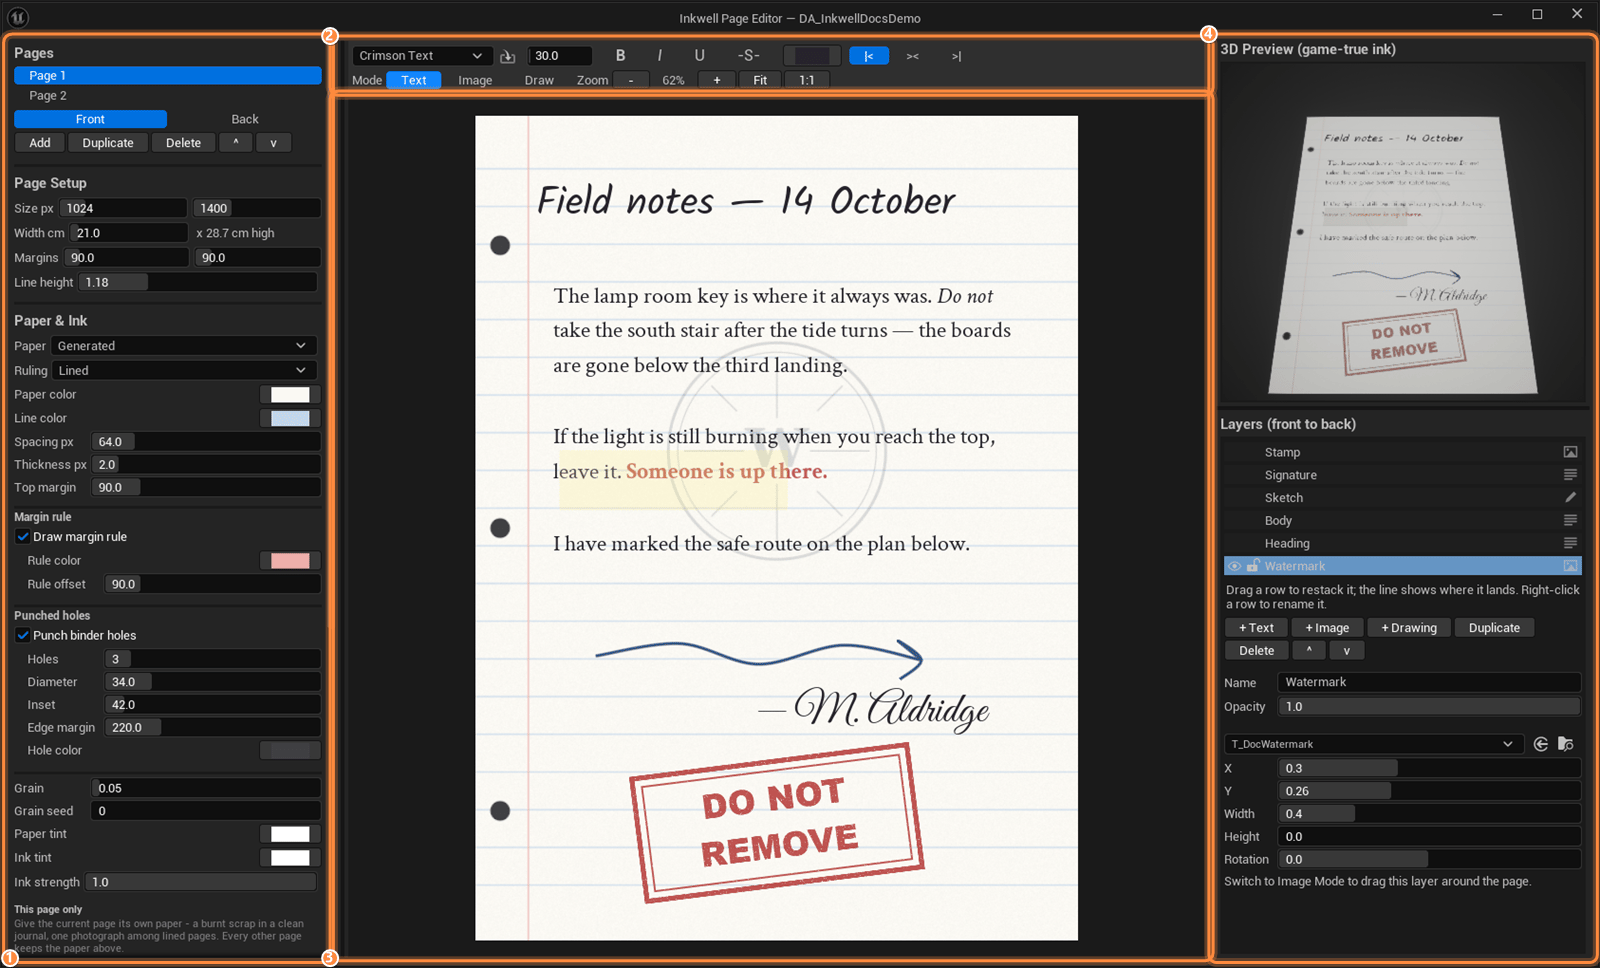 The document itself: the **Pages** list with the **Front** / **Back** flip under it,
then **Page Setup**, **Paper & Ink**, **Custom Mesh**, **Default Text Style**,
**Drawing Tools**, and the **Save Document** button at the bottom. Everything here
except the drawing tools is a property of the asset — see
[Page Documents](/plugins/inkwell/authoring/documents).
Styles the current text selection, carries the three **Mode** toggles that decide what
the page surface does with your mouse, and holds the **Zoom** controls.
The page at its authored pixel size, fitted to the pane until you zoom. You type here,
drag boxes here, and draw here.
**3D Preview (game-true ink)** on top, **Layers (front to back)** underneath, split by
a handle you can drag either way.
All three columns are one splitter, and the right column is another splitter inside it, so
you can give the space to whichever part of the job you are doing. Every pane has a minimum
size, so none of them can be dragged shut and lost.
The window opens at 1680 × 980, is titled *Inkwell Page Editor — DocumentName*, and
maximizes and minimizes normally. Each document gets **one** window: opening a document
that is already open brings its window to the front instead of making a second one.
## Opening the editor
The usual route. Double-clicking an Ink Page Document in the Content Browser opens the
Page Editor — the asset has no details-panel editor to open instead. Right-clicking the
asset and choosing **Edit Pages...** does the same thing. Both feed the toolbar
dropdown's Recent list, like every other route in.
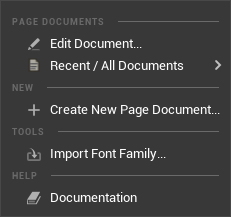
The **Page Editor** button on the level editor toolbar opens a menu with:
* **Edit Document...** — a browser dialog filtered to Page Documents.
* **Recent / All Documents** — the last eight documents you edited, listed by name,
above a searchable list of every Page Document in the project. The list answers from
the Asset Registry, so nothing is loaded until you click a row, and a document that
was deleted or renamed drops off the recent list by itself.
* **Create New Page Document...** — creates the asset and opens it.
* **Import Font Family...** — the [font import dialog](/plugins/inkwell/authoring/fonts).
* **Documentation** — opens this documentation in your browser.
**Tools → Inkwell** carries the same menu, which is where to look if your project turns
the toolbar button off (**Show Toolbar Button** in
[Project Settings → Plugins → Inkwell](/plugins/inkwell/reference/settings) — it takes effect after an
editor restart).
Right-click an actor in the level that references a Page Document and pick
**Edit Pages (DocumentName)...** from the **Inkwell** section. Inkwell finds the
document by scanning the actor *and all of its components* for any object property
pointing at a Page Document — hard, weak or soft, including inside arrays — so this
works on your own Blueprints, not only on the supplied
[Ink Page actor](/plugins/inkwell/components/page-actor). An actor referencing several documents gets
an **Edit Pages** submenu listing them all; an actor referencing none shows nothing at
all.
`Inkwell.OpenPageEditor /Game/Notes/DA_MyNote.DA_MyNote` opens that document. With no
argument it opens the document directly if the project has exactly one, and otherwise
prints every available object path to the Output Log so you can copy one.
The document itself: the **Pages** list with the **Front** / **Back** flip under it,
then **Page Setup**, **Paper & Ink**, **Custom Mesh**, **Default Text Style**,
**Drawing Tools**, and the **Save Document** button at the bottom. Everything here
except the drawing tools is a property of the asset — see
[Page Documents](/plugins/inkwell/authoring/documents).
Styles the current text selection, carries the three **Mode** toggles that decide what
the page surface does with your mouse, and holds the **Zoom** controls.
The page at its authored pixel size, fitted to the pane until you zoom. You type here,
drag boxes here, and draw here.
**3D Preview (game-true ink)** on top, **Layers (front to back)** underneath, split by
a handle you can drag either way.
All three columns are one splitter, and the right column is another splitter inside it, so
you can give the space to whichever part of the job you are doing. Every pane has a minimum
size, so none of them can be dragged shut and lost.
The window opens at 1680 × 980, is titled *Inkwell Page Editor — DocumentName*, and
maximizes and minimizes normally. Each document gets **one** window: opening a document
that is already open brings its window to the front instead of making a second one.
## Opening the editor
The usual route. Double-clicking an Ink Page Document in the Content Browser opens the
Page Editor — the asset has no details-panel editor to open instead. Right-clicking the
asset and choosing **Edit Pages...** does the same thing. Both feed the toolbar
dropdown's Recent list, like every other route in.
The **Page Editor** button on the level editor toolbar opens a menu with:
* **Edit Document...** — a browser dialog filtered to Page Documents.
* **Recent / All Documents** — the last eight documents you edited, listed by name,
above a searchable list of every Page Document in the project. The list answers from
the Asset Registry, so nothing is loaded until you click a row, and a document that
was deleted or renamed drops off the recent list by itself.
* **Create New Page Document...** — creates the asset and opens it.
* **Import Font Family...** — the [font import dialog](/plugins/inkwell/authoring/fonts).
* **Documentation** — opens this documentation in your browser.
**Tools → Inkwell** carries the same menu, which is where to look if your project turns
the toolbar button off (**Show Toolbar Button** in
[Project Settings → Plugins → Inkwell](/plugins/inkwell/reference/settings) — it takes effect after an
editor restart).
Right-click an actor in the level that references a Page Document and pick
**Edit Pages (DocumentName)...** from the **Inkwell** section. Inkwell finds the
document by scanning the actor *and all of its components* for any object property
pointing at a Page Document — hard, weak or soft, including inside arrays — so this
works on your own Blueprints, not only on the supplied
[Ink Page actor](/plugins/inkwell/components/page-actor). An actor referencing several documents gets
an **Edit Pages** submenu listing them all; an actor referencing none shows nothing at
all.
`Inkwell.OpenPageEditor /Game/Notes/DA_MyNote.DA_MyNote` opens that document. With no
argument it opens the document directly if the project has exactly one, and otherwise
prints every available object path to the Output Log so you can copy one.

 ## The toolbar
 Left to right (the toolbar wraps onto a second row when the window is narrow):
| Control | What it does |
| --------------------------- | -------------------------------------------------------------------------------------------------------------------------------------------------------------------------------------------------------------------------------------------------------------------------------------------------------------------------------------------------------------- |
| Font family | Applies a composite font to the selection. The list holds every runtime composite font found in the configured search paths. It opens on the document's **Default Font** when that font is in the list, otherwise on the first family found; it reads **Font...** only when no families were discovered at all. See [Fonts](/plugins/inkwell/authoring/fonts). |
| Import button | Opens the font import dialog — *"Import a folder of TTF fonts as page font families..."*. Newly built families appear in every open Page Editor's pickers without reopening anything. |
| Size | Font size of the selection, 6–300, in page pixels at 96 DPI. Deliberately **not** live: it applies when you release the slider or press Enter, because restyling rewrites the markup and clears the selection. |
| **B** / *I* | Switches the run to the family's Bold / Italic / BoldItalic face. |
| U / -S- | Underline and strikethrough. Both are opt-in per run and never inherited from the document defaults. |
| Color swatch | Text color for the selection. The picker applies on mouse-up. |
| Justify buttons | Justification — left, center, right. It belongs to **the text box you are editing**, not the page, so a heading layer can be centered over a body layer that is not. |
| Mode: Text / Image / Draw | The three edit modes, below. Switching mode is a view change and never dirties the document. |
| Zoom: − / % / + / Fit / 1:1 | How large the page is drawn — see [Zoom and pan](#zoom-and-pan). 100% is one page pixel per screen pixel. |
**The toolbar follows your cursor.** Click inside a styled passage and the controls update
to show that run's font, size, color, bold/italic (recovered from the typeface name, so
`BoldItalic` lights both), underline and strikethrough. On untagged text the size, color and
B/I/U/S toggles snap back to the document defaults while the font family stays armed for the
next run you style.
Selections survive toolbar clicks: the edit box keeps its selection when a button steals
focus, and focus returns to the text after each apply.
Bold and italic depend on the font actually having those faces — the tooltips say so:
*"Bold (needs a Bold face in the font)"*. A family with only a Regular face renders Regular
when you press **B**. That is a property of the font, not a bug; see
[Fonts](/plugins/inkwell/authoring/fonts) for building families with all four faces.
## The three modes
One page surface, three things your mouse can mean. The mode also switches itself when you
select a layer, so picking an image layer in the Layers panel puts you in Image mode rather
than leaving you clicking at something the current tool cannot touch.
| Mode | You can | You cannot |
| --------- | ---------------------------------------------------------------------------------------------------------------------------------------- | ----------------------------------------------------------- |
| **Text** | Type, place the caret, select and style runs, drag the selected text box by its outline, double-click an image or drawing to jump to it. | Drag image layers, draw strokes. |
| **Image** | Click and drag any visible, unlocked image layer by its whole area; select layers; double-click anything to jump to it. | Type — text editing is suspended and the writing grays out. |
| **Draw** | Draw and erase with the brush from the **Drawing Tools** panel; double-click a mark to jump to its layer. | Type, or drag anything — the brush owns the mouse. |
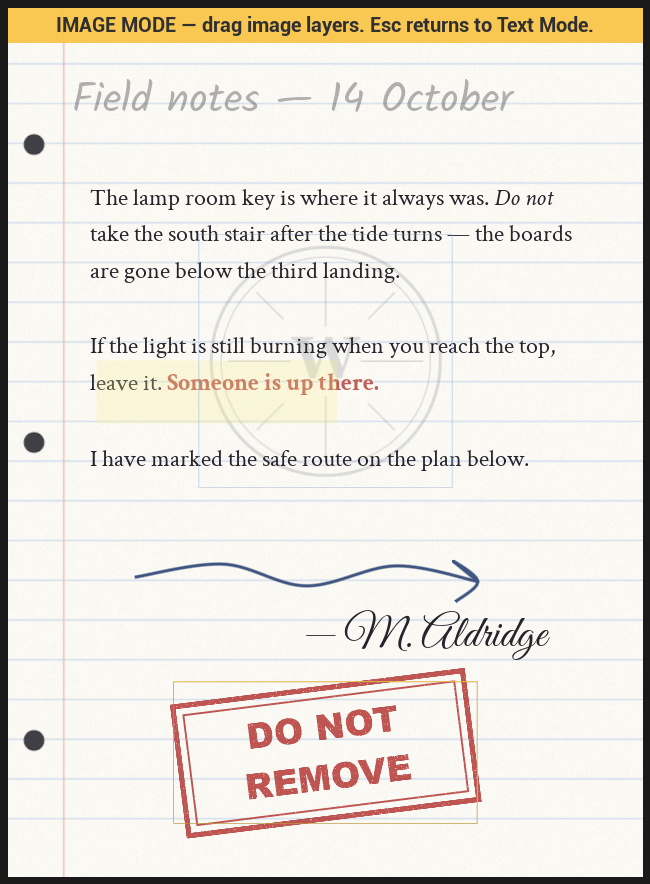
Outside Text mode a banner is drawn across the top of the page, in orange for Image mode and
blue for Draw mode, saying that text editing is off and how to get back to it:
> IMAGE MODE — drag image layers. Esc returns to Text Mode.
> DRAW MODE — draw on the page. Esc returns to Text Mode.
**Esc returns to Text mode** from anywhere in the window. Leaving Draw mode mid-stroke drops
that stroke — a mark belongs to the mode it was started in. Entering Draw mode with no
drawing layer selected points the selection at an existing drawing layer when the page has
one; otherwise the first stroke creates a new drawing layer to live in.
Left to right (the toolbar wraps onto a second row when the window is narrow):
| Control | What it does |
| --------------------------- | -------------------------------------------------------------------------------------------------------------------------------------------------------------------------------------------------------------------------------------------------------------------------------------------------------------------------------------------------------------- |
| Font family | Applies a composite font to the selection. The list holds every runtime composite font found in the configured search paths. It opens on the document's **Default Font** when that font is in the list, otherwise on the first family found; it reads **Font...** only when no families were discovered at all. See [Fonts](/plugins/inkwell/authoring/fonts). |
| Import button | Opens the font import dialog — *"Import a folder of TTF fonts as page font families..."*. Newly built families appear in every open Page Editor's pickers without reopening anything. |
| Size | Font size of the selection, 6–300, in page pixels at 96 DPI. Deliberately **not** live: it applies when you release the slider or press Enter, because restyling rewrites the markup and clears the selection. |
| **B** / *I* | Switches the run to the family's Bold / Italic / BoldItalic face. |
| U / -S- | Underline and strikethrough. Both are opt-in per run and never inherited from the document defaults. |
| Color swatch | Text color for the selection. The picker applies on mouse-up. |
| Justify buttons | Justification — left, center, right. It belongs to **the text box you are editing**, not the page, so a heading layer can be centered over a body layer that is not. |
| Mode: Text / Image / Draw | The three edit modes, below. Switching mode is a view change and never dirties the document. |
| Zoom: − / % / + / Fit / 1:1 | How large the page is drawn — see [Zoom and pan](#zoom-and-pan). 100% is one page pixel per screen pixel. |
**The toolbar follows your cursor.** Click inside a styled passage and the controls update
to show that run's font, size, color, bold/italic (recovered from the typeface name, so
`BoldItalic` lights both), underline and strikethrough. On untagged text the size, color and
B/I/U/S toggles snap back to the document defaults while the font family stays armed for the
next run you style.
Selections survive toolbar clicks: the edit box keeps its selection when a button steals
focus, and focus returns to the text after each apply.
Bold and italic depend on the font actually having those faces — the tooltips say so:
*"Bold (needs a Bold face in the font)"*. A family with only a Regular face renders Regular
when you press **B**. That is a property of the font, not a bug; see
[Fonts](/plugins/inkwell/authoring/fonts) for building families with all four faces.
## The three modes
One page surface, three things your mouse can mean. The mode also switches itself when you
select a layer, so picking an image layer in the Layers panel puts you in Image mode rather
than leaving you clicking at something the current tool cannot touch.
| Mode | You can | You cannot |
| --------- | ---------------------------------------------------------------------------------------------------------------------------------------- | ----------------------------------------------------------- |
| **Text** | Type, place the caret, select and style runs, drag the selected text box by its outline, double-click an image or drawing to jump to it. | Drag image layers, draw strokes. |
| **Image** | Click and drag any visible, unlocked image layer by its whole area; select layers; double-click anything to jump to it. | Type — text editing is suspended and the writing grays out. |
| **Draw** | Draw and erase with the brush from the **Drawing Tools** panel; double-click a mark to jump to its layer. | Type, or drag anything — the brush owns the mouse. |
Outside Text mode a banner is drawn across the top of the page, in orange for Image mode and
blue for Draw mode, saying that text editing is off and how to get back to it:
> IMAGE MODE — drag image layers. Esc returns to Text Mode.
> DRAW MODE — draw on the page. Esc returns to Text Mode.
**Esc returns to Text mode** from anywhere in the window. Leaving Draw mode mid-stroke drops
that stroke — a mark belongs to the mode it was started in. Entering Draw mode with no
drawing layer selected points the selection at an existing drawing layer when the page has
one; otherwise the first stroke creates a new drawing layer to live in.
 ## The page surface
The center pane draws the page at its real geometry — laid out in page pixels and scaled to
fit the pane — with the paper (tinted by **Paper Tint**) behind a transparent rich-text box.
**Typing.** Type straight onto the paper. Text auto-wraps, honors the text box's own
justification and line spacing, and renders untagged runs in the document's Default Text
Style. A text layer that fills the page wraps inside the document's
**Margins Px**; a placed text box wraps at its own width.
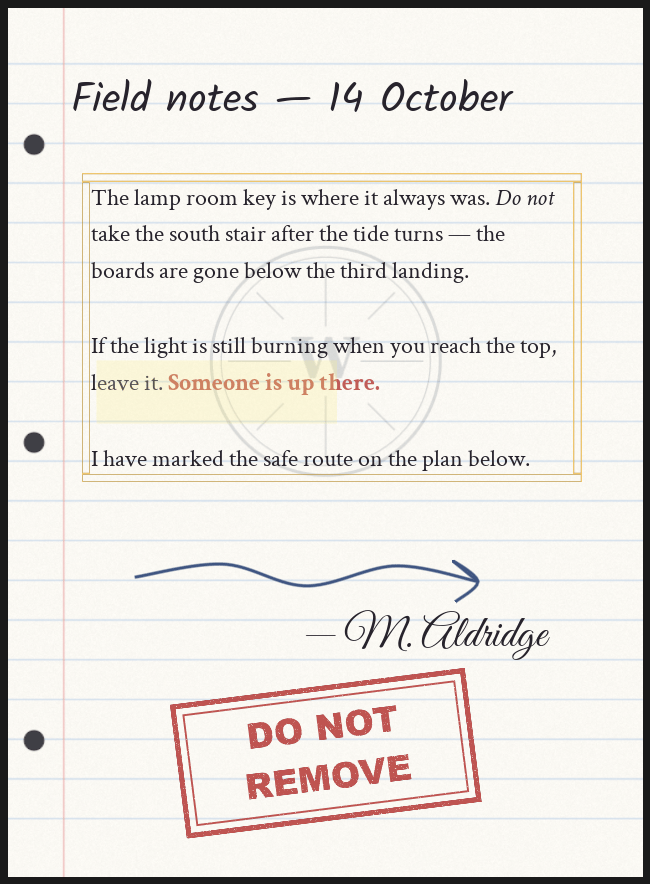
**Text box outlines.** In Text mode the **selected** text layer — and only that one — is
framed by four thin strips that sit just *outside* the box. Drag any strip to move the box.
The strips are outside the box on purpose: the interior stays genuinely empty, so a click in
the middle still lands on the writing and puts the caret where you aimed it. An outline
around every text box would bury a page whose author is trying to read what they wrote.
Dragging a page-filling text box is what turns it into a placed box. Until you drag it (or
type a Box W and Box H in the Layers panel), it stays page-filling and keeps following the
document margins. Setting Box W or Box H back to 0 spreads it over the page again.
**Dragging images.** In Image mode every visible, unlocked image layer gets a drag box over
its whole area — orange when selected, blue otherwise. Click to select, drag to move. Drags
convert screen pixels back into page pixels, so the result is the same at any zoom or pane
width, and one drag is one undo step. An image with no texture assigned still gets a box, so
you can position it before you have the art.
**Double-click anything to jump to it.** Double-clicking any element on the page selects its
layer *and* switches to the mode that edits it: writing lands you in Text mode with the caret
in that box, a picture in Image mode, a drawing in Draw mode. It works from any mode. Two
deliberate exceptions: locked layers refuse to be picked up, and double-clicking bare paper
does nothing rather than hunting for whatever is stacked behind it.
You are in Image or Draw mode — the banner across the page says so. Press **Esc**, or click
the **Text** mode toggle. Text editing is suspended in the other two modes so that a click
meant for a picture underneath the writing actually reaches it.
It is locked. Unlock it from the padlock on its row in the Layers panel, or from the row's
right-click menu. Locked layers still draw on the page and in the bake — locking is purely
an authoring aid. Hidden layers are not drawn at all, by the surface or the bake.
## Zoom and pan
The page opens fitted to its pane — and **Fit** stays live, following the splitter as you
resize. Everything else is on the toolbar's Zoom group and a few chords:
| Gesture | Effect |
| ---------------------------------- | ------------------------------------------------------------------- |
| **Ctrl + wheel** over the page | Zooms about the pointer, so the spot under the cursor stays put. |
| **Ctrl + =** / **Ctrl + -** | Zoom in / out one step (numpad **+** / **-** work too). |
| **Ctrl + 0** or the **Fit** button | Fit the whole page in the pane. |
| The **1:1** button | One page pixel per screen pixel — exactly what the bake rasterizes. |
| Wheel (page larger than the pane) | Scrolls the page. |
| Middle mouse drag | Pans the page in any direction. |
The zoom readout shows the current scale as a percentage; 100% is one page pixel per screen
pixel. Zooming is layout only — it changes nothing on the page, never dirties the document,
and page coordinates stay exact at any scale, so drags and strokes land where you aimed
them at any zoom. Zoom gestures are ignored mid-stroke so a slip of the wheel cannot
re-scale the page under a moving nib.
## Front and back
Every page is one face of a two-sided sheet. Directly under the Pages list sit two
full-width toggles, **Front** and **Back** — page picks the sheet, this picks the side:
* **A back starts blank** — bare paper — and exists (and costs anything) only once you put
a layer on it. Deleting a back's last layer blanks it again, returning the sheet to the
free, unauthored state.
* **A dot marks an authored back**: the Back toggle reads **Back •**, and a page row reads
**Page 2 •**, so a journal's backs can be surveyed from the list without flipping every
sheet.
* **The side survives paging.** Flipping through the backs of a journal page by page is a
real proofreading motion, so switching pages keeps you on the side you were reading.
* **A flip is navigation, never an edit** — turning the sheet over cannot dirty the asset.
Half-typed text lands on the side it was typed on, and a stroke started on one side never
commits onto the other.
* The [3D preview](#3d-preview-game-true-ink) turns the sheet over with you, so the back is
read from the same angle and lean as the front.
The back's paper — same as the front, or its own texture, generated sheet, or material —
is set in [Paper & Ink](/plugins/inkwell/authoring/documents#the-back-of-the-sheet). At runtime the
[Ink Page Reader](/plugins/inkwell/components/reader) flips sheets with **Flip Page** and reads multipage
documents in book order.
The guarantee that a page always has a Text layer is a front-side rule. A back gets a text
box when you add one (**+ Text** in the Layers panel while editing the back) — and unlike
the front, a back's last text layer *can* be deleted, because an empty back is legal.
## Pages
The **Pages** list at the top of the left panel is one toggle per page, plus five buttons:
| Button | Effect |
| --------- | --------------------------------------------------------------------- |
| Add | Inserts a new blank page after the current one. |
| Duplicate | Inserts a copy of the current page — layers, back and all — after it. |
| Delete | Removes the current page. A document always keeps at least one page. |
| ^ / v | Moves the current page up or down in the order. |
Add, Duplicate, Delete and the moves are undoable editor transactions. Switching between
pages is not an edit: paging around never dirties the asset, and a stroke started on the page
you are leaving is cancelled rather than committed onto the new one.
## Layers
The bottom half of the right panel is the layer stack for the current side of the current
page, titled **Layers (front to back)** — the front of the page is the top row. Drag a row
to restack it, right-click it to rename, and use the eye and padlock to hide or lock it. The
**+ Text**, **+ Image**, **+ Drawing**, **Duplicate** and **Delete** buttons build the
stack, and the properties below the list change with the selected layer's type.
[Layers](/plugins/inkwell/authoring/layers) is the full reference for the panel and for what each layer type
carries.
## Drawing Tools
The **Drawing Tools** section near the bottom of the left panel holds the **Brush** and
**Erase** tools, the brush type (Pen, Pencil, Marker, Crayon, Highlighter), ink color, size
in page pixels, and opacity. Picking a tool switches the page into Draw mode.
[Drawing](/plugins/inkwell/authoring/drawing) covers the brushes, the eraser and how strokes are stored.
## Paper & Ink
The **Paper & Ink** section sets the document's paper. The **Paper** dropdown carries the
four modes — **Texture asset**, **Generated**, **Custom material**, and **Mesh's own
material** — and the **Back paper** dropdown under it decides where the back of every sheet
gets its stock. Below those sit the ruling settings when generated, the per-page paper
override (labelled **This page only**, or **This page's back only** while you are editing
the back), and the paper tint, ink tint and ink strength.
[Paper](/plugins/inkwell/authoring/paper) covers generated paper in full;
[Page Documents](/plugins/inkwell/authoring/documents#paper-ink) lists the properties, the four modes and
their defaults.
## Custom Mesh
The **Custom Mesh** section previews the document on your own mesh — a bent note, a board,
a book — instead of the flat bundled sheet:
| Control | What it does |
| ----------------- | --------------------------------------------------------------------------------------------------------------------------------------------------------------------------------------------------------------- |
| Mesh picker | The document's **Preview Mesh**. Unset, the 3D preview shows the bundled flat sheet sized from the document — which is also exactly what a mesh-less actor gets in game, so the default preview is never a lie. |
| Slot | Which material slot the page lands in, listed as `index: SlotName` so the DCC's own slot names tell you which face is which. |
| Auto fit | Measures the UV rectangle the chosen slot's triangles actually cover and fits the page to it — for a face that does not span the whole 0–1 UV square. |
| Rotate | Turns the page a quarter turn on the face, for the unwrap that runs sideways or upside down. |
| Reset | Back to the flat-sheet assumption: the page spans the whole 0–1 UV square, unrotated. |
| Ink on back faces | Whether back faces show the writing (mirrored, the way ink shows through thin paper) or bare paper. |
A readout under the buttons reports the current face region and rotation. These settings are
editor-only preview intent — copy them onto the display component's **Page Face** when the
real prop uses the same mesh, so the game matches what you authored against. See
[Ink Page Display](/plugins/inkwell/components/page-display).
## 3D Preview (game-true ink)
The top half of the right panel is not another view of the page surface — it is the page on
a real mesh in a lit scene. Inkwell bakes the current side's layers into a linear,
transparent ink render target through the exact runtime bake path, then composites it
through the **lit page material a placed actor wears** — roughness response and all — on
the bundled sheet sized from the document, or on the document's **Preview Mesh**.
**Left-drag orbits, wheel zooms**, and flipping to the Back turns the mesh over while the
camera holds still. In **Mesh's own material** mode the preview drives the ink onto the
mesh's own slot material, exactly as the game will — including showing *no ink at all* when
that material lacks `MF_InkwellPageInk`, which is the same contract your players get.
That is why the two panes differ, and the differences are the point:
* The surface carries editing furniture the preview does not: the caret, text box outlines,
image drag boxes, the mode banner.
* **Ink Tint** and **Ink Strength** are material work, so they show up in the preview, not on
the surface.
* The preview shows the ink as it will sit on the paper and the mesh — where a stroke lets
grain through, where a highlighter goes under the writing, how the sheet catches the
light.
Bakes are coalesced to at most five a second while you edit, and are held off entirely
during a **Size px** or **Width cm** drag, when every tick would reallocate the render
targets. Hidden layers are skipped by the preview and the bake alike. An unauthored back
costs nothing: its render target is never allocated.
If no page material can be loaded — a project that cleared the setting, for instance — the
preview shows the bare mesh and logs one warning naming the fix: set **Page Ink Material**
in [Project Settings → Plugins → Inkwell](/plugins/inkwell/reference/settings).
Pages already placed in the level update live as you edit, because every edit bumps the
document's [content revision](/plugins/inkwell/authoring/documents#the-content-revision) and re-sizes the
placed sheets. You do not need to press Play to check a layout in context.
## Save Document
The primary button at the bottom of the left panel saves the asset — and, before it does,
**rebuilds the document's hard font references**: *"Saves the Page Document and refreshes its
hard font references so the fonts cook."*
That second half matters more than it sounds. Markup stores fonts as string paths, which the
cooker cannot follow. Save Document walks every text layer on both sides of every page,
collects the fonts used, adds the effective default font, and writes them into the
document's **Font References** list so they get cooked. Anything you are still typing is
flushed into the file first.
Saving the asset another way — Ctrl+S, Save All, the Content Browser — writes the pages
correctly but does not refresh the font references. Finish an authoring session with
**Save Document** at least once, or a packaged build can render fallback glyphs where a
styled run's font failed to cook. Never clear
[Font References](/plugins/inkwell/authoring/documents#pages) by hand.
## Undo and redo
Every edit the Page Editor makes is a normal editor transaction on the document asset, so it
lands on the editor's own undo stack and the History panel lists Inkwell's steps by name
("Draw Stroke", "Move Text Box", "Reorder Layer", "Set Page Width (cm)"). The Page Editor
window binds no undo keys of its own — undo and redo from the editor's usual **Edit → Undo**
and **Edit → Redo** — and the open window follows the document wherever the stack takes it.
Two behaviors are worth knowing:
* **Typing is grouped into bursts.** A run of keystrokes is one undo step, closed by the first
pause of about a second, by switching page, side or layer, or by any other edit. One step
per keystroke would make Ctrl+Z useless.
* **One gesture is one step.** A slider drag, an image drag or a single brush stroke undoes as
a whole, including the drawing layer a stroke had to create to live in — undoing a mark that
left a new empty layer behind would not be undoing the mark.
Undo also refreshes the window from the asset, so the text box, the layer list and the preview
all follow the document back.
## Next
The stack that makes up a page, and everything the Layers panel does.
The five brushes, the eraser, and how strokes are stored.
Every property the editor edits, with its real default.
The ready-made Ink Page actor — drag in, pick your document, done.
## The page surface
The center pane draws the page at its real geometry — laid out in page pixels and scaled to
fit the pane — with the paper (tinted by **Paper Tint**) behind a transparent rich-text box.
**Typing.** Type straight onto the paper. Text auto-wraps, honors the text box's own
justification and line spacing, and renders untagged runs in the document's Default Text
Style. A text layer that fills the page wraps inside the document's
**Margins Px**; a placed text box wraps at its own width.
**Text box outlines.** In Text mode the **selected** text layer — and only that one — is
framed by four thin strips that sit just *outside* the box. Drag any strip to move the box.
The strips are outside the box on purpose: the interior stays genuinely empty, so a click in
the middle still lands on the writing and puts the caret where you aimed it. An outline
around every text box would bury a page whose author is trying to read what they wrote.
Dragging a page-filling text box is what turns it into a placed box. Until you drag it (or
type a Box W and Box H in the Layers panel), it stays page-filling and keeps following the
document margins. Setting Box W or Box H back to 0 spreads it over the page again.
**Dragging images.** In Image mode every visible, unlocked image layer gets a drag box over
its whole area — orange when selected, blue otherwise. Click to select, drag to move. Drags
convert screen pixels back into page pixels, so the result is the same at any zoom or pane
width, and one drag is one undo step. An image with no texture assigned still gets a box, so
you can position it before you have the art.
**Double-click anything to jump to it.** Double-clicking any element on the page selects its
layer *and* switches to the mode that edits it: writing lands you in Text mode with the caret
in that box, a picture in Image mode, a drawing in Draw mode. It works from any mode. Two
deliberate exceptions: locked layers refuse to be picked up, and double-clicking bare paper
does nothing rather than hunting for whatever is stacked behind it.
You are in Image or Draw mode — the banner across the page says so. Press **Esc**, or click
the **Text** mode toggle. Text editing is suspended in the other two modes so that a click
meant for a picture underneath the writing actually reaches it.
It is locked. Unlock it from the padlock on its row in the Layers panel, or from the row's
right-click menu. Locked layers still draw on the page and in the bake — locking is purely
an authoring aid. Hidden layers are not drawn at all, by the surface or the bake.
## Zoom and pan
The page opens fitted to its pane — and **Fit** stays live, following the splitter as you
resize. Everything else is on the toolbar's Zoom group and a few chords:
| Gesture | Effect |
| ---------------------------------- | ------------------------------------------------------------------- |
| **Ctrl + wheel** over the page | Zooms about the pointer, so the spot under the cursor stays put. |
| **Ctrl + =** / **Ctrl + -** | Zoom in / out one step (numpad **+** / **-** work too). |
| **Ctrl + 0** or the **Fit** button | Fit the whole page in the pane. |
| The **1:1** button | One page pixel per screen pixel — exactly what the bake rasterizes. |
| Wheel (page larger than the pane) | Scrolls the page. |
| Middle mouse drag | Pans the page in any direction. |
The zoom readout shows the current scale as a percentage; 100% is one page pixel per screen
pixel. Zooming is layout only — it changes nothing on the page, never dirties the document,
and page coordinates stay exact at any scale, so drags and strokes land where you aimed
them at any zoom. Zoom gestures are ignored mid-stroke so a slip of the wheel cannot
re-scale the page under a moving nib.
## Front and back
Every page is one face of a two-sided sheet. Directly under the Pages list sit two
full-width toggles, **Front** and **Back** — page picks the sheet, this picks the side:
* **A back starts blank** — bare paper — and exists (and costs anything) only once you put
a layer on it. Deleting a back's last layer blanks it again, returning the sheet to the
free, unauthored state.
* **A dot marks an authored back**: the Back toggle reads **Back •**, and a page row reads
**Page 2 •**, so a journal's backs can be surveyed from the list without flipping every
sheet.
* **The side survives paging.** Flipping through the backs of a journal page by page is a
real proofreading motion, so switching pages keeps you on the side you were reading.
* **A flip is navigation, never an edit** — turning the sheet over cannot dirty the asset.
Half-typed text lands on the side it was typed on, and a stroke started on one side never
commits onto the other.
* The [3D preview](#3d-preview-game-true-ink) turns the sheet over with you, so the back is
read from the same angle and lean as the front.
The back's paper — same as the front, or its own texture, generated sheet, or material —
is set in [Paper & Ink](/plugins/inkwell/authoring/documents#the-back-of-the-sheet). At runtime the
[Ink Page Reader](/plugins/inkwell/components/reader) flips sheets with **Flip Page** and reads multipage
documents in book order.
The guarantee that a page always has a Text layer is a front-side rule. A back gets a text
box when you add one (**+ Text** in the Layers panel while editing the back) — and unlike
the front, a back's last text layer *can* be deleted, because an empty back is legal.
## Pages
The **Pages** list at the top of the left panel is one toggle per page, plus five buttons:
| Button | Effect |
| --------- | --------------------------------------------------------------------- |
| Add | Inserts a new blank page after the current one. |
| Duplicate | Inserts a copy of the current page — layers, back and all — after it. |
| Delete | Removes the current page. A document always keeps at least one page. |
| ^ / v | Moves the current page up or down in the order. |
Add, Duplicate, Delete and the moves are undoable editor transactions. Switching between
pages is not an edit: paging around never dirties the asset, and a stroke started on the page
you are leaving is cancelled rather than committed onto the new one.
## Layers
The bottom half of the right panel is the layer stack for the current side of the current
page, titled **Layers (front to back)** — the front of the page is the top row. Drag a row
to restack it, right-click it to rename, and use the eye and padlock to hide or lock it. The
**+ Text**, **+ Image**, **+ Drawing**, **Duplicate** and **Delete** buttons build the
stack, and the properties below the list change with the selected layer's type.
[Layers](/plugins/inkwell/authoring/layers) is the full reference for the panel and for what each layer type
carries.
## Drawing Tools
The **Drawing Tools** section near the bottom of the left panel holds the **Brush** and
**Erase** tools, the brush type (Pen, Pencil, Marker, Crayon, Highlighter), ink color, size
in page pixels, and opacity. Picking a tool switches the page into Draw mode.
[Drawing](/plugins/inkwell/authoring/drawing) covers the brushes, the eraser and how strokes are stored.
## Paper & Ink
The **Paper & Ink** section sets the document's paper. The **Paper** dropdown carries the
four modes — **Texture asset**, **Generated**, **Custom material**, and **Mesh's own
material** — and the **Back paper** dropdown under it decides where the back of every sheet
gets its stock. Below those sit the ruling settings when generated, the per-page paper
override (labelled **This page only**, or **This page's back only** while you are editing
the back), and the paper tint, ink tint and ink strength.
[Paper](/plugins/inkwell/authoring/paper) covers generated paper in full;
[Page Documents](/plugins/inkwell/authoring/documents#paper-ink) lists the properties, the four modes and
their defaults.
## Custom Mesh
The **Custom Mesh** section previews the document on your own mesh — a bent note, a board,
a book — instead of the flat bundled sheet:
| Control | What it does |
| ----------------- | --------------------------------------------------------------------------------------------------------------------------------------------------------------------------------------------------------------- |
| Mesh picker | The document's **Preview Mesh**. Unset, the 3D preview shows the bundled flat sheet sized from the document — which is also exactly what a mesh-less actor gets in game, so the default preview is never a lie. |
| Slot | Which material slot the page lands in, listed as `index: SlotName` so the DCC's own slot names tell you which face is which. |
| Auto fit | Measures the UV rectangle the chosen slot's triangles actually cover and fits the page to it — for a face that does not span the whole 0–1 UV square. |
| Rotate | Turns the page a quarter turn on the face, for the unwrap that runs sideways or upside down. |
| Reset | Back to the flat-sheet assumption: the page spans the whole 0–1 UV square, unrotated. |
| Ink on back faces | Whether back faces show the writing (mirrored, the way ink shows through thin paper) or bare paper. |
A readout under the buttons reports the current face region and rotation. These settings are
editor-only preview intent — copy them onto the display component's **Page Face** when the
real prop uses the same mesh, so the game matches what you authored against. See
[Ink Page Display](/plugins/inkwell/components/page-display).
## 3D Preview (game-true ink)
The top half of the right panel is not another view of the page surface — it is the page on
a real mesh in a lit scene. Inkwell bakes the current side's layers into a linear,
transparent ink render target through the exact runtime bake path, then composites it
through the **lit page material a placed actor wears** — roughness response and all — on
the bundled sheet sized from the document, or on the document's **Preview Mesh**.
**Left-drag orbits, wheel zooms**, and flipping to the Back turns the mesh over while the
camera holds still. In **Mesh's own material** mode the preview drives the ink onto the
mesh's own slot material, exactly as the game will — including showing *no ink at all* when
that material lacks `MF_InkwellPageInk`, which is the same contract your players get.
That is why the two panes differ, and the differences are the point:
* The surface carries editing furniture the preview does not: the caret, text box outlines,
image drag boxes, the mode banner.
* **Ink Tint** and **Ink Strength** are material work, so they show up in the preview, not on
the surface.
* The preview shows the ink as it will sit on the paper and the mesh — where a stroke lets
grain through, where a highlighter goes under the writing, how the sheet catches the
light.
Bakes are coalesced to at most five a second while you edit, and are held off entirely
during a **Size px** or **Width cm** drag, when every tick would reallocate the render
targets. Hidden layers are skipped by the preview and the bake alike. An unauthored back
costs nothing: its render target is never allocated.
If no page material can be loaded — a project that cleared the setting, for instance — the
preview shows the bare mesh and logs one warning naming the fix: set **Page Ink Material**
in [Project Settings → Plugins → Inkwell](/plugins/inkwell/reference/settings).
Pages already placed in the level update live as you edit, because every edit bumps the
document's [content revision](/plugins/inkwell/authoring/documents#the-content-revision) and re-sizes the
placed sheets. You do not need to press Play to check a layout in context.
## Save Document
The primary button at the bottom of the left panel saves the asset — and, before it does,
**rebuilds the document's hard font references**: *"Saves the Page Document and refreshes its
hard font references so the fonts cook."*
That second half matters more than it sounds. Markup stores fonts as string paths, which the
cooker cannot follow. Save Document walks every text layer on both sides of every page,
collects the fonts used, adds the effective default font, and writes them into the
document's **Font References** list so they get cooked. Anything you are still typing is
flushed into the file first.
Saving the asset another way — Ctrl+S, Save All, the Content Browser — writes the pages
correctly but does not refresh the font references. Finish an authoring session with
**Save Document** at least once, or a packaged build can render fallback glyphs where a
styled run's font failed to cook. Never clear
[Font References](/plugins/inkwell/authoring/documents#pages) by hand.
## Undo and redo
Every edit the Page Editor makes is a normal editor transaction on the document asset, so it
lands on the editor's own undo stack and the History panel lists Inkwell's steps by name
("Draw Stroke", "Move Text Box", "Reorder Layer", "Set Page Width (cm)"). The Page Editor
window binds no undo keys of its own — undo and redo from the editor's usual **Edit → Undo**
and **Edit → Redo** — and the open window follows the document wherever the stack takes it.
Two behaviors are worth knowing:
* **Typing is grouped into bursts.** A run of keystrokes is one undo step, closed by the first
pause of about a second, by switching page, side or layer, or by any other edit. One step
per keystroke would make Ctrl+Z useless.
* **One gesture is one step.** A slider drag, an image drag or a single brush stroke undoes as
a whole, including the drawing layer a stroke had to create to live in — undoing a mark that
left a new empty layer behind would not be undoing the mark.
Undo also refreshes the window from the asset, so the text box, the layer list and the preview
all follow the document back.
## Next
The stack that makes up a page, and everything the Layers panel does.
The five brushes, the eraser, and how strokes are stored.
Every property the editor edits, with its real default.
The ready-made Ink Page actor — drag in, pick your document, done.